爱站程序员基地
shell01
类似于widnows下批处理文件
bash的特性
gnu bash
自动补全 –多用tab键
历史记录 history
–!$ –代表上一条命令后面的部分
–!984 –重复运行第984条命令
–!useradd –从下往上匹配,第一个以useradd开头的
–CTRL+R键 –进入匹配模式
~ –代表家目录
别名功能 alias unalias
管道
重定向
作业管理 jobs管理
shell编程
变量:
变量的用途
1,例$PATH,为了搜索方便
2,脚本里,使用变量可以引用方便
环境变量:
env –列举所有的环境变量
set –环境变量之外的自定义的变量也会列举出来
PS1=\'[\\u@\\h \\W]\\$ \’
\\t 24小时格式时间
\\H 完整的主机名
\\v bash版本
PS1=\'[\\u@\\h \\W\\t]\\$ \’ –可以修改加上时间
PS1=\’my server–>\’ –也可以直接换成一段字符串
如果要永久支持,可以放到环境变量的文件
全局
/etc/profile
/etc/bashrc
每个用户的家目录下
~/.bashrc
~/.bash_profile
[root@server4 ~]# locale –语言有关的变量
LANG=en_US.UTF-8 –主语言的环境
LC_CTYPE=\”en_US.UTF-8\”
LC_NUMERIC=\”en_US.UTF-8\”
LC_TIME=\”en_US.UTF-8\”
LC_COLLATE=\”en_US.UTF-8\”
LC_MONETARY=\”en_US.UTF-8\”
LC_MESSAGES=\”en_US.UTF-8\”
LC_PAPER=\”en_US.UTF-8\”
LC_NAME=\”en_US.UTF-8\”
LC_ADDRESS=\”en_US.UTF-8\”
LC_TELEPHONE=\”en_US.UTF-8\”
LC_MEASUREMENT=\”en_US.UTF-8\”
LC_IDENTIFICATION=\”en_US.UTF-8\”
LC_ALL=
上面的变量一般不要去改,如果要改变语言集,可以改下面的文件
vim /etc/sysconfig/i18n
下面是临时修改的方法
[root@server4 ~]# export LANG=en_US.UTF-8
[root@server4 ~]# export LANG=zh_CN.UTF-8
如果电脑允许注销或者重启,直接在登录的界面选语言集就好了
shell脚本常识:
#!/bin/sh #!/bin/bash #!/bin/env bash
#! 两个字节的魔法字符,在Linux里用来定义文件类型,表示用哪个程序来解释下面的语句
这是一个不成文的要求
# <comment>
注释
<< 可用来多行注释
chmod +x <>.sh
sh <>.sh bash <>.sh # 这种情况下, 脚本的#!不再生效
一个优秀的脚本, 除了要优秀地完成任务, 还要有漂亮的代码, 以及有用的帮助, 必要的参数!
shell的变量
不需要申明,弱类型
export定义变量,把自定义变量转化为环境变量
[root@server4 ~]# a=1 –把1赋值给变量a
[root@server4 ~]# echo $a –看变量的值
1
[root@server4 ~]# bash –进入子bash环境
[root@server4 ~]# echo $a –发现查不到变量a
[root@server4 ~]# exit –退出到父bash
exit
[root@server4 ~]# export a=1 –使用export
[root@server4 ~]# echo $a
1
[root@server4 ~]# bash
[root@server4 ~]# echo $a –再次进入子bash,就可以查看到变量a的值
1
declare typeset –这两个也是定义变量的,都是内部命令
[root@server4 ~]# b=1+1
[root@server4 ~]# echo $b
1+1
[root@server4 ~]# declare -i b=1+1
[root@server4 ~]# echo $b
2
变量定义的规则:
1,区分大小写
2,定义时的格式,等号两边不能有空格,对于有空格的字符串,要用引号引起来
[root@server4 ~]# B=\’ 3fds afsa\’
[root@server4 ~]# echo $B
3fds afsa
3,单引号与双引号的,单引的变量或者特殊字符就是为一般字符;但双引内的变量或者特殊字符可以保持它的变量特性
[root@server4 ~]# echo $a
1
[root@server4 ~]# echo \’$a\’
$a
[root@server4 ~]# echo \”$a\”
1
4,变量名可以是字母和数字, _ , 但不能以数字开头
[root@server4 ~]# a1=2
[root@server4 ~]# echo $a1
2
[root@server4 ~]# 1a=3
bash: 1a=3: command not found
5,变量的获取方式 $变量名 ${变量名}
[root@server4 ~]# echo ${a}
1
[root@server4 ~]# echo $a
1
6,取消变量的定义
[root@server4 ~]# unset a
[root@server4 ~]# echo $a
7,比较特殊的变量定义方式
[root@server4 ~]# a=`which mount`
[root@server4 ~]# rpm -qf $a
util-linux-2.13-0.52.el5
[root@server4 ~]# a=$(which vi) –小括号
[root@server4 ~]# rpm -qf $a
vim-minimal-7.0.109-6.el5
[root@server4 ~]# read a –这样主要是由运行脚本的用户去定义变量的值
hello world
[root@server4 ~]# echo $a
hello world
例一:
echo -n \’input your name:\’ –echo使用-n参数代表输出之后不换行
read name
echo \”welcome, $name\”
read -p \”input your name:\” name –read使用-p参数同上一样的效果
echo \”welcome, $name\”
read -p \”input your major:\” -t 5 major –t参数指定输入值的时间只有五秒
echo \”$name\’s major is $major\”
read -s -p \”input your password:\” password –s参数代表隐藏输入
echo
echo \”$name\’s password is $password\”
read -d \’;\’ abc
read -e abc # readline
read -e -i \’/var/log/audit/audit.log\’ abc # 给readline指定一个默认值
read -n 2 abc #只允许输入几个字符
# read -t 3 abc
# echo $abc
# read -e -i \’7788\’ -t 3 abc
7788#
#
# echo $abc
# read -e -i \’7788\’ -t 3 abc
7788
# echo $abc
7788
#
例二:使用普通用户在文本终端模拟root用户登录,并保存root用户的密码
#!/bin/bash
hostnamehead=`hostname |cut -d \’.\’ -f1`
#hostnamehead=`hostname -s`
clear
echo -n \”Red Hat Enterprise Linux Server release 5.6 (Tikanga)\”
#echo -n `cat /etc/redhat-release`
echo
echo -n \”Kernel `uname -r` on an `uname -m`\”
echo
echo
read -p \”$hostnamehead login:\” username
read -s -p \”Password:\” password
sleep 3
echo
echo \”Login incorrect\”
echo \”$username\’s password is $password\” >> /pub/classNote/ule-scripts/shell/shell01/rootpassword.txt
echo
echo
sh $0
———————————–
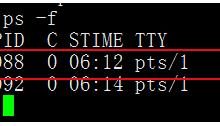
echo $$ 返回程序的PID
echo $0 代表运行的脚本的名字
echo $1 代表运行脚本后接的第一个参数
echo $2 代表运行脚本后接的第二个参数
…………………………
echo ${10}
echo $*
echo $@ 代表所有参数
echo $? 执行成功则返回0 ,执行失败则返回非0值
例三:
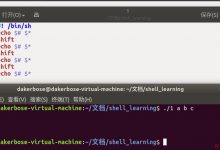
[root@server4 shell01]# cat example01.sh
#!/bin/bash
echo $$
echo $0
echo $1
echo $2
echo $(($1+$2))
echo $*
echo $@
echo $?
[root@server4 shell01]# sh example01.sh 1 2 –用sh命令去执行
[root@server4 shell01]# ./example01.sh 1 2 –./也可以执行,但要执行权限
小练习:
<#>:
要求用户输入两个数字,然后打印出这两个数的和与差。
结果类似:
Input the 1st number: 2
Input the 2nd number: 7
Result:
2+7=9
2-7=-5
ps.
`bc<<<2+7`
echo \’2+7\’ | bc
echo $[2+7]
echo $((2+7))
例四,
以一个日志文件为例比如说是/var/log/aaa.log
每天备份/var/log/aaa.log并移到专门的备份目录下/backup,并改名有时间标记
#!/bin/bash
#
#backup /var/log/rsyncd.log
#
# copy the log to /work/backup, and rename to \’rsync-`data +%F`.log\’
cp /var/log/rsyncd.log /work/backup/rsyncd-$(date +%F).log
# empty the log
:> /var/log/rsyncd.log
之后就是把这个脚本放到计划任务里去执行
01 3 * * * sh /path/shell.sh
例五,日志切割脚本
改进上面的例子
每天备份/var/log/aaa.log并移到专门的备份目录下/backup的年目录/月目录,并改名有时间标记 ;比如说是2010-09-06号把昨天的日志给移到/backup/2010/09/2010-09-05.aaa.log
提示:[root@server4 shell01]# date -d \’yesterday\’ +\’%Y-%m-%d\’
2010-09-05
下面是没有变量的情况,看起来非常难受
#!/bin/bash
mkdir /backup/`date -d \’yesterday\’ +\’%Y\’`/`date -d \’yesterday\’ +\’%m\’` -p
mv /var/log/aaa.log /backup/`date -d \’yesterday\’ +\’%Y\’`/`date -d \’yesterday\’ +\’%m\’`/`date -d \’yesterday\’ +\’%Y-%m-%d\’`.aaa.log
touch /var/log/aaa.log
例六
改为变量的情况
#!/bin/bash
year=`date -d \’yesterday\’ +\’%Y\’`
month=`date -d \’yesterday\’ +\’%m\’`
day=`date -d \’yesterday\’ +\’%Y-%m-%d\’`
logpath=\”/backup\” –这里有一点要注意,定义的目录后面有没有/,在引用时最好都加一个/,多个/是没有问题的,少/就有问题了
mkdir -p /backup/$year/$month –如果目录存在,再建立会报错,加-p参数时可以避免这个报错信息
mv /var/log/aaa.log $logpath/$year/$month/$day.aaa.log
touch /var/log/aaa.log
eg:
#!/bin/bash
#
#backup /var/log/rsyncd.log
#
oldfile=\’/var/log/rsyncd.log\’
filename=\”rsyncd-`date -d \’yesterday\’ +%F`.log\”
year=`date -d \’yesterday\’ +%Y`
month=`date -d \’yesterday\’ +%m`
bakpath=\”/work/backup/$year/$month\”
mkdir -p $bakpath
cp $oldfile $bakpath/$filename -rf
:> $oldfile
1 0 * * * bash /work/shell01/backup01.sh
———————————————————–
重定向
1,标准输入(stdin);代码为0, 使用<或者<< –默认设备是键盘
2,标准输出(stdout);代码为1, 使用>或者>>或者1>或者1>> –默认设备是屏幕
3,错误输出(stderr);代码为2, 使用2> 或者 2>> –默认设备是屏幕
cat > abc.log <<EOF
…
EOF
标准输入 ----> 命令 ---->标准输出 -->设备/文件
|
|
|
错误输出
|
|
设备/文件
[a@server4 ~]$ find /home/ -name a
/home/a –标准输出
find: /home/aa: Permission denied –下面全是错误输出
find: /home/user2/.ssh: Permission denied
find: /home/d: Permission denied
find: /home/b: Permission denied
find: /home/c: Permission denied
find: /home/user1: Permission denied
find: /home/smb2: Permission denied
find: /home/g: Permission denied
find: /home/f: Permission denied
find: /home/e: Permission denied
find: /home/bb: Permission denied
find: /home/smb: Permission denied
[a@server4 ~]$ find /home/ -name a > /home/a/find.log –把标准输出重定向到一个文件,所以屏幕显示的是错误输出
find: /home/aa: Permission denied
find: /home/user2/.ssh: Permission denied
find: /home/d: Permission denied
find: /home/b: Permission denied
find: /home/c: Permission denied
find: /home/user1: Permission denied
find: /home/smb2: Permission denied
find: /home/g: Permission denied
find: /home/f: Permission denied
find: /home/e: Permission denied
find: /home/bb: Permission denied
find: /home/smb: Permission denied
[a@server4 ~]$ cat /home/a/find.log
[a@server4 ~]$ find /home/ -name a > /home/a/find.log 2> /home/a/finderr.log
–标准输出和错误输出都重定向到不同的文件
[a@server4 ~]$ find /home/ -name a > /home/a/findunion.log 2>> /home/a/findunion.log–标准输出和错误输出都重定向到相同的文件
[a@server4 ~]$ find /home/ -name a > /home/a/findunion.log 2>&1
–标准输出和错误输出都重定向到相同的文件,这种写法比较特殊,最好用这种
[a@server4 ~]$ find /home/ -name a > /dev/null 2>&1 –如果不需要脚本运行过程中的信息,可以扔到/dev/null
双重重定向
[root@server4 ~]# last |tee /home/a/last.txt –又显示到屏幕,同时还重定向到一个文件
[root@server4 ~]# cat > cat.txt <<EOF
> sdfsagweqtg
> dfgdgfdgdse
> dfgsgdfs
ctrl+d –结束,写脚本时用EOF代替
here document
例七;使用EOF实现非shell环境下的命令执行
#!/bin/bash
passwd <<EOF
newpasswd
newpasswd
EOF
——————————————————-
管道
grep cut
[root@server4 shell01]# cat /etc/passwd |grep root
[root@server4 shell01]# cat /etc/syslog.conf |grep -v \’^#\’|grep -v \’^;\’|grep -v ^$
cut –多用于日志截取,对多个空格的处理比较吃力,那种情况就可以使用awk等别的工具
-d 接分隔符
-f 指定分隔后第几列
[root@server4 shell01]# cat /etc/passwd |cut -d : -f7 –显示/etc/passwd文件里以:号分隔的第七列
截取本机的IP
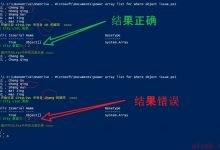
[root@server4 shell01]# ifconfig eth0| grep Bcast |cut -d \” \” -f2 –发现没有得到结果,因为前面有多个空格
[root@server4 shell01]# ifconfig eth0| grep Bcast |cut -d \” \” -f12 |cut -d \”:\” -f2 –但是可以试出来多个空格,这里是-f12
10.1.1.45
[root@server4 shell01]# ifconfig eth0| grep Bcast |cut -d \”:\” -f2 |cut -d \” \” -f1 –可以先以:号分隔,再以空格分隔
10.1.1.45
——————————————–
排序统计有关的命令: wc sort uniq
wc
-l 显示行数
-w 显示单词数
-m 显示字符数
默认不加任何参数,就表示相当是上面三个参数都加
[root@server4 shell01]# cat /root/cat.txt |wc
3 6 39
[root@server4 shell01]# cat /root/cat.txt |wc -l –这个用得比较广泛
3
[root@server4 shell01]# cat /root/cat.txt |wc -w
6
[root@server4 shell01]# cat /root/cat.txt |wc -m
39
sort 排序
-r 反向排序
-n 以数字来排
-f 大小写不敏感
-t 分隔符 类似cut里的-d
-k 第几列 类似cut里的-f
[root@server4 shell01]# cat /etc/passwd |sort–默认以字母来排序,a-z
[root@server4 shell01]# cat /etc/passwd |sort -r–以字母反向排序
[root@server4 shell01]# cat /etc/passwd |sort -t \”:\” -k 3 –以:分隔的第三列也就是uid来排序,但是发现不是以数字大小来排,比如说这里 86排到了9的前面
[root@server4 shell01]# cat /etc/passwd |sort -t \”:\” -k 3 -n –要加上-n参数,来以数字大小排序
uniq 唯一 (unique)
注意的是:只在连续的范围内去掉重复值,只留一下
[root@server4 shell01]# cat /etc/passwd | cut -d \”:\” -f 7 |uniq
[root@server4 shell01]# cat /etc/passwd | cut -d \”:\” -f 7 |sort |uniq
从下面两个看出,顺序的不同,对结果是有很大影响的
[root@server4 shell01]# cat /etc/passwd | cut -d \”:\” -f 7 |grep bash |uniq
/bin/bash
[root@server4 shell01]# cat /etc/passwd | cut -d \”:\” -f 7 |uniq |grep bash
/bin/bash
/bin/bash
/bin/bash
/bin/bash
-c参数是count计算统计的意思
[root@server4 shell01]# cat /etc/passwd | cut -d \”:\” -f 7 |uniq -c
1 /bin/bash
4 /sbin/nologin
1 /bin/sync
1 /sbin/shutdown
1 /sbin/halt
1 /sbin/nologin
1
28 /sbin/nologin –表示一共连续28个/sbin/nologin
2 /bin/bash
1 /sbin/nologin
6 /bin/bash
1 /sbin/nologin
6 /bin/bash
———————————————————————
命令执行的判断顺序
;
&&
||
[root@server4 shell01]# ./configure ;make ;make install
[root@server4 shell01]# ./configure && make && make install –这两句结果一样,都是执行前面OK后,再执行后面
注意下面两个符号意义相反
[root@server4 shell01]# ls /test/ && touch /test/1 –前面执行成功,则执行后面
[root@server4 shell01]# ls /test/ || touch /test/2 –前面执行失败,才执行后面
当&&和||混用时,可以替换条件判断语句,但要注意的是逻辑上不要搞乱了
下面要使用&&和||混用来实现
如果/test存在,则输出existed
如果/test不存在,则输出not existed
注意要使用&&再使用||
正常写法:
[root@server4 shell01]# ls /test/ && echo \’existed\’ || echo \’not existed\’
existed
[root@server4 shell01]# ls /testsdfsafa/ && echo \’existed\’ || echo \’not existed\’
ls: /testsdfsafa/: No such file or directory
not existd
错误写法:
[root@server4 shell01]# ls /test/ || echo \’existed\’ && echo \’not existed\’
[root@server4 shell01]# ls /testgsdgsa/ || echo \’existed\’ && echo \’not existed\’
ls: /testgsdgsa/: No such file or directory
existed
not existed
—————————————————————-
例八:
条件判断:
if 命令 ; then
动作
fi
if 命令 ; then
动作
else
动作
fi
if 命令 ; then
动作
elif 命令;then
动作
else
动作
fi
man test 可以查看很多判断的条件的帮助
文件存在与否和类型的判断
-e 是否存在
-f 是否为文件
-d 是否为目录
-L 是否为链接文件
-p 是否为管道文件
-b block
-c character
-S socket
-s 是否为非空文件
文件权限的判断
-r 是否可读
-w 是否可写
-x 是否可执行
-u 是否有suid,就是前三位是否有s位
-g 是否有sgid
-k 是否有t位
两个文件的比较判断
-nt: file1 -nt file2 比较file1是否比file2新
-ot: file1 -ot file2 比较file1是否比file2旧
-ef: 比较是否为同一个文件,用于判断硬链接,指向的是同一个innode号
整数之间的判断
-eq 相等
-ne 不等
-gt 大于
-lt 小于
-ge 大于等于
-le 小于等于
字符串之间的判断和比较
-z 是否为空字符串
-n 是否为非空字符串
string1 = string2 是否相等
string1 != string2 是否不等
多重条件判断
-a 条件1 -a 条件2 两个条件都满足,才为true
-o 条件1 -o 条件2 两个条件满足其一,就为true
#!/bin/bash
#判断/etc/inittab是否存在
if [ -e /etc/inittab ];then #注意中括号内的两边要有空格
echo \’/etc/inittab existed\’
else
echo \’/etc/inittab not existed\’
fi
echo \’=========================================\’
#判断/etc是否为目录
if [ -d /etc ];then
echo \’/etc/ is a directory\’
else
echo \’/etc/ is not a directory\’
fi
echo \’=========================================\’
#判断/test/1是否为非空文件
if [ -s \”/test/1\” ];then
echo \’/test/1 is not a empty file\’
else
echo \’/test/1 is a empty file\’
fi
echo \’=========================================\’
#判断/tmp目录是否有t位
if [ -k /tmp ];then
echo \’/tmp has a sticky bit set\’
else
echo \’/tmp has not a sticky bit set\’
fi
echo \’=========================================\’
#判断两个文件的新旧
if [ \’/test/1\’ -nt \’/test/2\’ ];then
echo \’1 is newer than 2\’
else
echo \’1 is older than 2\’
fi
echo \’=========================================\’
#判断硬连接
if [ /var/spool/mail -ef /var/mail ];then
echo \’they are hard links\’
else
echo \’they are not hard links\’
fi
echo \’=========================================\’
#比较两个数值的大小
if [ 100 -ne 200 ];then
echo \’the two numbers are not equal\’
else
echo \’the two numbers are equal\’
fi
echo \’=========================================\’
#判断是否为空字符串
if [ -z \’\’ ];then #空格也是为非空,所以空字符串是引号内什么都没有
echo \’the lenth of string is zero\’
else
echo \’the lenth of string is not zero\’
fi
echo \’=========================================\’
#字符串间的比较
if [ \’aBc\’ != \’abc\’ ];then
echo \’the string are not equal\’
else
echo \’the string are equal\’
fi
echo \’=========================================\’
#多重条件判断
if [ -d /etc -o -e \’/test/1\’ ] ;then
echo \’/etc is a directory and /test/1 existed\’
else
echo \’/etc/ is not a directory or /test/1 not existed\’
fi
———————————————————–
题目:
1,交互模式输入一个年份,判断是否为闰年 (被4整除,但不能被100整除,或者能被400整除的就是闰年);熟悉if 结构和 && ||混合使用结构;最好能使用这两种方法写出来
read -p \”input the year:\” year
if [ $((year%4)) -eq 0 -a $((year%100)) -ne 0 -o $((year%400)) -eq 0 ];then
echo \’this is a leap year\’
else
echo \’this is not a leap year\’
fi
[[ $((year%4)) -eq 0 && $((year%100)) -ne 0 || $((year%400)) -eq 0 ]] && echo OK || echo KO
2,交互模式输入一个IP,判断是否能ping通这个IP
echo -n \”input a ip address:\”
read ip
ping -c 1 $ip >/dev/null 2>&1
if [ \”$?\” -eq 0 ];then
echo \’this ip is up!\’
else
echo \’this ip is down!\’
fi
3,交互模式输入一个文件,判断它的类型和权限,输出结果
read -e -p \”input a file name:\” file
if [ ! -e \”$file\” ];then
echo \”$file is not existed or it is not regular file\”
exit 1
fi
if [ -r \”$file\” ];then
echo \”read=yes\”
else
echo \”read=no\”
fi
if [ -w \”$file\” ];then
echo \”write=yes\”
else
echo \”write=no\”
fi
if [ -x \”$file\” ];then
echo \”execution=yes\”
else
echo \”execution=no\”
fi
4, 猜数字的游戏, 输入一个0-99的数字, 判断是否正确(与程序得到的随机数1-99比较)
提示: $RANDOM 可以取个随机数
5. 成绩判断
让运行脚本的用户输入一个名字和他的成绩,成绩必须是0-100. 否则退出程序,并显示错误信息
判断用户输入的成绩:
0-59: 显示\”差\”
60-79:显示\”良\”
80-100:显示\”优\”
显示结果类似:
用户: 小李飞刀
成绩: 98
等级: 优
6,sort,uniq练习
shell01笔记目录下有一个sortuniq.txt
排成下面的形式
一:
2 lp:x:4:7:lp:/var/spool/lpd:/sbin/nologin
4 news:x:9:13:news:/etc/news:
6 uucp:x:10:14:uucp:/var/spool/uucp:/sbin/nologin
1 apache:x:48:48:Apache:/var/www:/sbin/nologin
1 ftp:x:14:50:FTP User:/www:/sbin/nologin
cat sortuniq.txt |sort|uniq -c |sort -t \”:\” -k 4 -n
二:
6 uucp:x:10:14:uucp:/var/spool/uucp:/sbin/nologin
4 news:x:9:13:news:/etc/news:
2 lp:x:4:7:lp:/var/spool/lpd:/sbin/nologin
1 ftp:x:14:50:FTP User:/www:/sbin/nologin
1 apache:x:48:48:Apache:/var/www:/sbin/nologin
cat sortuniq.txt |sort|uniq -c|sort -n -r
转载于:Shell/3251865