爱站程序员基地
[toc]
Linux 磁盘分区和挂载
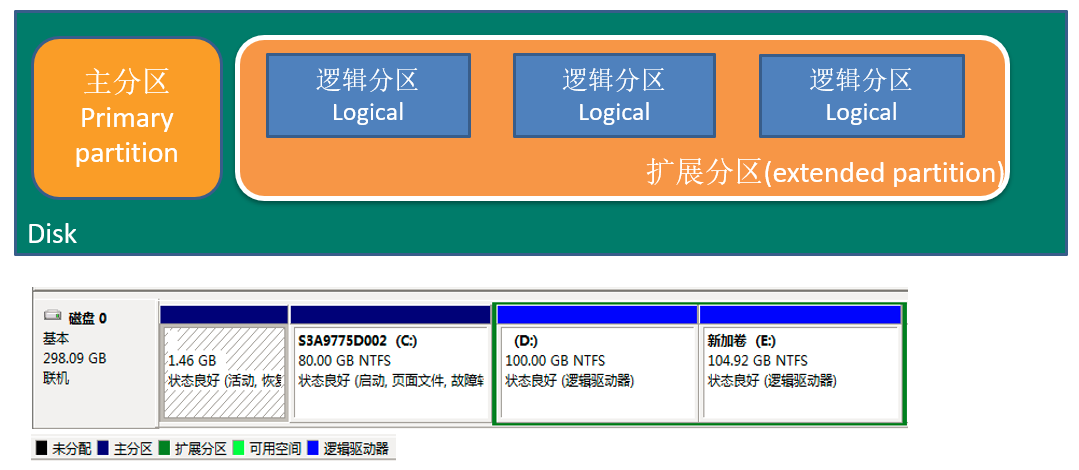
windows 下的分区
磁盘管理
Linux系统中磁盘管理就是将硬盘通过挂载的方式挂载到Linux文件系统中
相关命令
-
lsblk
:用于列出所有可用块设备的信息,而且还能显示他们之间的依赖关系数据来源-
/sys/dev/block
-
df -h
:df可显示磁盘的文件系统与使用情形,-h是格式化输出
- 分区命令:
fdisk
:分区2TB以下的磁盘,最多可以分4个分区
-
gdisk
:分区2TB以上的磁盘,最多可以分128个分区
- 注.fdisk和gdisk,2TB不是限制,有时候超过2TB分区不稳定所以建议使用gdisk
mkfs.xfs
mount
/
umount
分区及挂载实现步骤
- 添加硬盘(虚拟机编辑设置)
- 创建分区(fdisk/gdisk)
- 格式化文件系统(mkfs.xfs)
- 挂载(mount)
详细步骤如下操作?
添加硬盘
1、 打开VMware,选择编辑虚拟机设置

2、选择添加按键

3、点击硬盘,选择下一步

4、选择SCSI,下一步
补充:Linux硬盘分IDE硬盘和SCSI硬盘,目前基本上都是SCSI硬盘
对于IDE硬盘,驱动标识为“
hdx~
”,其中“
hd
”分区所在的设备类型,这里指IDE硬盘了。“
x
”为盘号(a为基本盘,b为基本从属盘,c为辅助盘,d为辅助从属盘),“
~
”代表分区,前4个分区用数字1~4表示,他们是主分区或扩展分区,从5开始就是逻辑分区。如:hda3表示为第一个IDE硬盘上的第三个主分区或扩展分区
对于SCSI硬盘则标识为“sdx~”,SCSI硬盘是用“sd”来表示分区所在设备的类型的,其余则和IDE硬盘的表示方法一样

5、选择创建新虚拟硬盘,下一步

6、设置磁盘大小

7、选择位置存放

添加磁盘完成!

通过lsblk查看本机磁盘及分区情况

分区步骤
1、创建分区
fdisk /dev/sdb
或
gdisk /dev/sdb
- 补充:磁盘分区命令操作:
Command actiona toggle a bootable flagb edit bsd disklabelc toggle the dos compatibility flagd delete a partitiong create a new empty GPT partition tableG create an IRIX (SGI) partition tablel list known partition typesm print this menun add a new partitiono create a new empty DOS partition tablep print the partition tableq quit without saving changess create a new empty Sun disklabelt change a partition\'s system idu change display/entry unitsv verify the partition tablew write table to disk and exitx extra functionality (experts only)# 用啥大家翻译一下吧,鄙人也得翻译# 常用的如下:n : 新建一个分区p : 打印分区表w : 写入磁盘并退出q : 退出d : 删除一个分区
步骤
[root@localhost ~]# fdisk /dev/sdbCommand (m for help): n # ---添加新分区Select (default p): p # ---默认为p,可以不输入Partition number (3,4, default 3): # 默认值为3,因为前面分了两个了First sector (314574848-4294967295, default 314574848): # 起始区,这里默认值就行了Last sector, +sectors or +size{K,M,G} (314574848-4294967294, default 4294967294): +10GPartition 3 of type Linux and of size 10 GiB is set# 终止分区,自己添加,这里我添加10G作为例子Command (m for help): w # ---写入磁盘并退出The partition table has been altered!
通过lsblk查看分区情况

挂载步骤
1、格式化文件系统
[root@localhost ~]# mkfs.xfs /dev/sdb3meta-data=/dev/sdb3 isize=512 agcount=4, agsize=655360 blks= sectsz=512 attr=2, projid32bit=1= crc=1 finobt=0, sparse=0data = bsize=4096 blocks=2621440, imaxpct=25= sunit=0 swidth=0 blksnaming =version 2 bsize=4096 ascii-ci=0 ftype=1log =internal log bsize=4096 blocks=2560, version=2= sectsz=512 sunit=0 blks, lazy-count=1realtime =none extsz=4096 blocks=0, rtextents=0
2、挂载
[root@localhost ~]# mount /dev/sdb3 /root/sdb3[root@localhost ~]# df -hFilesystem Size Used Avail Use% Mounted ondevtmpfs 223M 0 223M 0% /devtmpfs 235M 0 235M 0% /dev/shmtmpfs 235M 5.5M 229M 3% /runtmpfs 235M 0 235M 0% /sys/fs/cgroup/dev/mapper/centos-root 100G 3.4G 97G 4% //dev/sda1 509M 142M 368M 28% /boottmpfs 47M 0 47M 0% /run/user/0/dev/sdb3 10G 33M 10G 1% /root/sdb3

3、不想要可以卸载
[root@localhost ~]# umount /dev/sdb3[root@localhost ~]# df -hFilesystem Size Used Avail Use% Mounted ondevtmpfs 223M 0 223M 0% /devtmpfs 235M 0 235M 0% /dev/shmtmpfs 235M 5.5M 229M 3% /runtmpfs 235M 0 235M 0% /sys/fs/cgroup/dev/mapper/centos-root 100G 3.4G 97G 4% //dev/sda1 509M 142M 368M 28% /boottmpfs 47M 0 47M 0% /run/user/0
注:卸载挂载易错点:
1、卸载的时候不能进入挂载的路径,也就是说,如果你现在挂载到/root/sdb3里面,但是你进到/root/sdb3里面的时候卸载时也会报错。
2、卸载光写卸载的目录路径就行,不用写挂载时的路径,例如卸载/root/sdb3,光写umount /root/sdb3
gdisk和fdisk一样,步骤如下:
[root@localhost ~]# gdisk /dev/sdb# 分区命令说明Command (? for help): ?b back up GPT data to a filec change a partition\'s named delete a partitioni show detailed information on a partitionl list known partition typesn add a new partitiono create a new empty GUID partition table (GPT)p print the partition tableq quit without saving changesr recovery and transformation options (experts only)s sort partitionst change a partition\'s type codev verify diskw write table to disk and exitx extra functionality (experts only)? print this menu# 添加新分区Command (? for help): n# 这两步默认就好Partition number (4-128, default 4):First sector (34-8388607966, default = 335546368) or {+-}size{KMGTP}:# +30个GLast sector (335546368-8388607966, default = 8388607966) or {+-}size{KMGTP}: +30G# 默认回车Hex code or GUID (L to show codes, Enter = 8300):Command (? for help): w # 写入OK; writing new GUID partition table (GPT) to /dev/sdb.The operation has completed successfully.

卸载分区步骤
# 查看[root@localhost ~]# lsblkNAME MAJ:MIN RM SIZE RO TYPE MOUNTPOINTsda 8:0 0 100G 0 disk├─sda1 8:1 0 512M 0 part /boot└─sda2 8:2 0 99.5G 0 part└─centos-root 253:0 0 99.5G 0 lvm /sdb 8:16 0 3.9T 0 disk├─sdb1 8:17 0 100G 0 part├─sdb2 8:18 0 50G 0 part├─sdb3 8:19 0 10G 0 part└─sdb4 8:20 0 30G 0 partsr0 11:0 1 4.4G 0 rom# 卸载sdb4,主要内容粘贴如下:[root@localhost ~]# fdisk /dev/sdbCommand (m for help): d # ---删除Partition number (1-4, default 4): 4 # 删除sdb4Command (m for help): w # 写入,保存# 查看[root@localhost ~]# lsblkNAME MAJ:MIN RM SIZE RO TYPE MOUNTPOINTsda 8:0 0 100G 0 disk├─sda1 8:1 0 512M 0 part /boot└─sda2 8:2 0 99.5G 0 part└─centos-root 253:0 0 99.5G 0 lvm /sdb 8:16 0 3.9T 0 disk├─sdb1 8:17 0 100G 0 part├─sdb2 8:18 0 50G 0 part└─sdb3 8:19 0 10G 0 partsr0 11:0 1 4.4G 0 rom# 成功卸载!
补充:
lsblk和df的区别:
- lsblk 查看的是block device,也就是逻辑磁盘大小。
- df查看的是file system, 也就是文件系统层的磁盘大小。
永久挂载:
mount是临时挂载,重启就没了
-
命令 fdisk-l,查看未挂载硬盘
-
硬盘uuid查看命令:blkid [路径]
-
查看到UUID写入 /etc/fstab文件