本期内容概要
内容详细
1、高可用
1.1、什么是高可用
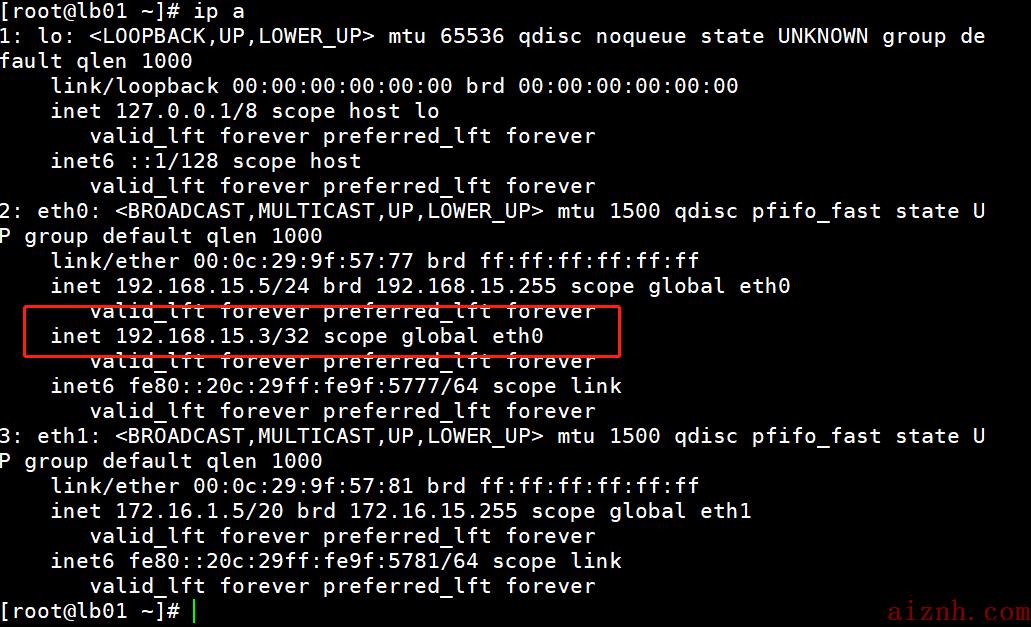
"""一般是指2台机器启动着完全相同的业务系统,当有一台机器down机了,另外一台服务器就能快速的接管,对于访问的用户是无感知的"""比如公司的网络是通过网关进行上网的,那么如果该路由器故障了,网关无法转发报文了,此时所有人都无法上网了,怎么办?\'\'\'通常做法是给路由器增加一台备节点,但是问题是,如果我们的主网关master故障了,用户是需要手动指向backup的,如果用户过多修改起来会非常麻烦\'\'\'问题一:假设用户将指向都修改为backup路由器,那么master路由器修好了怎么办?问题二:假设Master网关故障,我们将backup网关配置为master网关的ip是否可以?\'\'\'其实是不行的,因为PC第一次通过ARP广播寻找到Master网关的MAC地址与IP地址后,会将信息写到ARP的缓存表中,那么PC之后连接都是通过那个缓存表的信息去连接,然后进行数据包的转发,即使我们修改了IP但是Mac地址是唯一的,pc的数据包依然会发送给master。(除非是PC的ARP缓存表过期,再次发起ARP广播的时候才能获取新的backup对应的Mac地址与IP地址)\'\'\'如何才能做到出现故障自动转移?\'\'\'此时VRRP就出现了我们的VRRP其实是通过软件或者硬件的形式在Master和Backup外面增加一个虚拟的MAC地址(VMAC)与虚拟IP地址(VIP),那么在这种情况下,PC请求VIP的时候,无论是Master处理还是Backup处理,PC仅会在ARP缓存表中记录VMAC与VIP的信息\'\'\'
1.2、常用的工具
1.硬件通常使用 F52.软件通常使用 keepalivedkeepalived:它的诞生最初是为ipvs(一些服务,内核中的一些规则)提供高可用性的,最初最主要目的是能够自主调用ipvsadm来生成规则,并且能够自动实现将用户访问的地址转移到其他节点上进行实现的\'\'\'keepalived:核心包含两个ckechers和VRRP协议\'\'\'
1.3、VRRP协议
VRRP是一种容错协议,它保证当主机的下一跳路由器出现故障时,由另一台路由器来代替出现故障的路由器进行工作,从而保持网络通信的连续性和可靠性, VRRP中每个节点之间都有优先级的,一般为0-255 (0,255有特殊用法)数字越大优先级越高VRRP协议会在一个局域网中进行广播
1.4、部署keepalived
1.安装 keepalived[root@lb01 ~]# yum install keepalived -y[root@lb02 ~]# yum install keepalived -y2.Keepalived配置[root@lb01 ~]# vim /etc/keepalived/keepalived.conf# 配置标题! Configuration File for keepalived# 全局配置global_defs {# 当前keepalived的唯一标识router_id lb01}# 配置VRRP协议vrrp_instance VI_1 {# 状态,MASTER和BACKUPstate MASTER# 绑定网卡interface eth0# 虚拟路由标示,可以理解为分组virtual_router_id 50# 优先级priority 100# 监测心跳间隔时间advert_int 1# 配置认证authentication {# 认证类型auth_type PASS# 认证的密码auth_pass 1111}# 设置VIPvirtual_ipaddress {# 虚拟的VIP地址192.168.15.3}}[root@lb02 ~]# vim /etc/keepalived/keepalived.conf# 配置标题! Configuration File for keepalived# 全局配置global_defs {# 当前keepalived的唯一标识(***改动***)router_id lb02}# 配置VRRP协议vrrp_instance VI_1 {# 状态,MASTER和BACKUP(***改动***)state BACKUP# 绑定网卡interface eth0# 虚拟路由标示,可以理解为分组virtual_router_id 50# 优先级(***改动***)priority 90# 监测心跳间隔时间advert_int 1# 配置认证authentication {# 认证类型auth_type PASS# 认证的密码auth_pass 1111}# 设置VIPvirtual_ipaddress {# 虚拟的VIP地址192.168.15.3}}# 启动[root@lb01 ~]# systemctl enable --now keepalived[root@lb02 ~]# systemctl enable --now keepalived


# 在 lb02 中部署 lb01 同等配置的nginx环境[root@lb01 ~]# scp nginx-1.20.2.tar.gz [email protected]:/root/[root@lb01 ~]# nginx -Vnginx version: nginx/1.20.2built by gcc 4.8.5 20150623 (Red Hat 4.8.5-44) (GCC)built with OpenSSL 1.0.2k-fips 26 Jan 2017TLS SNI support enabledconfigure arguments: --with-http_gzip_static_module --with-stream --with-http_ssl_module --with-http_sub_module[root@lb02 ~]# tar -xf nginx-1.20.2.tar.gz[root@lb02 ~]# cd nginx-1.20.2[root@lb02 nginx-1.20.2]# lltotal 788drwxr-xr-x 6 1001 1001 326 Jan 10 18:13 auto-rw-r--r-- 1 1001 1001 312251 Nov 16 22:44 CHANGES-rw-r--r-- 1 1001 1001 476577 Nov 16 22:44 CHANGES.rudrwxr-xr-x 2 1001 1001 168 Jan 10 18:13 conf-rwxr-xr-x 1 1001 1001 2590 Nov 16 22:44 configuredrwxr-xr-x 4 1001 1001 72 Jan 10 18:13 contribdrwxr-xr-x 2 1001 1001 40 Jan 10 18:13 html-rw-r--r-- 1 1001 1001 1397 Nov 16 22:44 LICENSEdrwxr-xr-x 2 1001 1001 21 Jan 10 18:13 man-rw-r--r-- 1 1001 1001 49 Nov 16 22:44 READMEdrwxr-xr-x 9 1001 1001 91 Jan 10 18:13 src[root@lb02 nginx-1.20.2]# yum install openssl openssl-devel zlib zlib-devel -y[root@lb02 nginx-1.20.2]# ./configure --with-http_gzip_static_module --with-stream --with-http_ssl_module --with-http_sub_module[root@lb02 nginx-1.20.2]# make[root@lb02 nginx-1.20.2]# make install[root@lb02 nginx-1.20.2]# cd /usr/local/nginx[root@lb02 nginx]# lltotal 0drwxr-xr-x 2 root root 333 Jan 10 18:19 confdrwxr-xr-x 2 root root 40 Jan 10 18:19 htmldrwxr-xr-x 2 root root 6 Jan 10 18:19 logsdrwxr-xr-x 2 root root 19 Jan 10 18:19 sbin[root@lb02 nginx]# cd sbin[root@lb02 sbin]# lltotal 6944-rwxr-xr-x 1 root root 7110376 Jan 10 18:19 nginx[root@lb02 sbin]# mv nginx /usr/sbin/[root@lb02 sbin]# lltotal 0[root@lb02 sbin]# nginx -vnginx version: nginx/1.20.2[root@lb02 sbin]# cd[root@lb02 ~]# systemctl start nginx[root@lb01 ~]# scp /usr/lib/systemd/system/nginx.service [email protected]:/usr/lib/systemd/system/[root@lb02 ~]# systemctl daemon-reload[root@lb02 ~]# systemctl start nginx[root@lb01 ~]# scp -r /etc/nginx/ [email protected]:/etc/nginx/[root@lb02 ~]# cd /etc/nginx/# 查看与lb01中内容是否一致[root@lb02 nginx]# ll[root@lb02 nginx]# groupadd www -g 666[root@lb02 nginx]# useradd www -u 666 -g 666 -M -r[root@lb02 nginx]# mkdir /var/log/nginx[root@lb02 nginx]# chown -R www.www /var/log/nginx[root@lb02 nginx]# systemctl start nginx.service[root@lb02 nginx]# systemctl status nginx.service -l\'\'\'测试:浏览器访问 192.168.15.6/192.168.15.3都正常访问则正常
1.5、怎么解决keepalived的脑裂问题
两台高可用服务器在指定时间内,无法互相检查到对方的心跳而各自启动故障转移功能1.如果Nginx宕机怎么办?想办法告诉keepalived,Nginx的情况写入脚本[root@lb01 ~]# vim checkNG.sh#!/bin/bash# 解决Nginx无法正常启动ps -ef | grep -q ginxif [ $? -ne 0 ];then# 代表Nginx未正常启动systemctl start nginx &>/dev/nullsleep 2ps -ef | grep -q ginxif [ $? -ne 0 ];thensystemctl stop keepalivedfifi2.局域网之内,keepalived无法相互广播,怎么办?判断VIP是否可以ping的通写入脚本:VIP=192.168.15.3ping -c 1 $VIP &>/dev/nullif [ $? -eq 0 ];then# 代表VIP还可以访问...(后期再说)fi"""$? : 上一条命令执行的结果$? : 0 TURE$? : 1 FALSE& : 正确的标准输出和错误的标准输出"""
1.6、怎么实现脚本自动启动(并且为非抢占式更改IP)
实现非抢占式1、状态全部设置成backup(lb01 lb02)2、增加 nopreempt[root@lb01 ~]# mv checkNG.sh /etc/keepalived/[root@lb01 ~]# scp /etc/keepalived/keepalived.conf /etc/keepalived/checkNG.sh 192.168.15.6:/etc/keepalived/[root@lb02 ~]# vim /etc/keepalived/keepalived.conf# 配置标题! Configuration File for keepalived# 全局配置global_defs {# 当前keepalived的唯一标识(***改动***)router_id lb02}# 检测脚本vrrp_script check_nginx {# 指定脚本路径script "/etc/keepalived/checkNG.sh"# 执行间隔interval 5}# 配置VRRP协议vrrp_instance VI_1 {# 状态,MASTER和BACKUP(***改动***)state BACKUP# 开启非抢占式(***改动***)nopreempt# 绑定网卡interface eth0# 虚拟路由标示,可以理解为分组virtual_router_id 50# 优先级priority 90# 监测心跳间隔时间advert_int 1# 配置认证authentication {# 认证类型auth_type PASS# 认证的密码auth_pass 1111}# 设置VIPvirtual_ipaddress {# 虚拟的VIP地址192.168.15.3}# 调用检查track_script {check_nginx}}[root@lb02 ~]# systemctl restart keepalived[root@lb01 ~]# chmod +x /etc/keepalived/checkNG.sh[root@lb02 ~]# chmod +x /etc/keepalived/checkNG.sh测试:lb01中查看状态[root@lb01 ~]# systemctl status nginx关闭[root@lb01 ~]# systemctl stop nginx查看状态[root@lb01 ~]# systemctl status nginx会发现依旧是开启状态 因为脚本自动执行开启了nginx在db中ping[root@db01 ~]# while true; do curl -I 192.168.15.3; done在 lb01 执行[root@lb01 ~]# systemctl stop keepalived会在 db01 中发现卡顿 因为公共IP切换到 lb02了[root@lb01 ~]# systemctl start keepalived在 db01 中不会卡顿 查询IP发现 公共IP依旧在 lb02
2、四层负载均衡
假设有三台MySQL数据库,请问怎样负载均衡?\'\'\'在非HTTP协议的情况下,采用的四层负载均衡的方式负载服务注意:四层负载均衡中不支持域名在HTTP协议的情况下,采用的是七层负载均衡的方式\'\'\'[root@lb01 ~]# cd /etc/nginx/[root@lb01 nginx]# vim nginx.conf添加以下内容:stream {include /etc/nginx/stream/*.conf}[root@lb01 nginx]# mkdir stream[root@lb01 nginx]# cd stream[root@lb01 stream]# vim mysql.confserver {listen 3306;proxy_pass 172.16.1.61:3306;}[root@lb01 stream]# nginx -t[root@lb01 stream]# systemctl restart nginx测试:(db01 )[root@ ~]# mysql -h172.16.1.5 -uroot -p123456能连接成功 则代表正常# 案例:使用四层负载均衡实现SSH的代理,端口为1122[root@lb01 stream]# vim ssh.conf写入以下内容:server {listen 1122;proxy_pass 172.16.1.5:22;}测试:通过任一台已经连接的客户端 ssh [email protected] -p1122连接成功 即代表正常"""tail -f /var/log/nginx/error.log 查看日志"""


 爱站程序员基地


