爱站程序员基地
微软官方 powershell v3 教程视频笔记(自)
- 视频:https://www.bilibili.com/video/BV1554y1Q76b?p=1
- 请不要将本笔记作为详细的powershell新手教程,该笔记只是为了方便快速的回顾查看知识点。
- 如果没有任何编程经验的同学去看这篇文章是不建议的,建议去看规范的powershell教程
- 如有错误,请务必指出!!!如需转载,请指明出处!!!
1. get start scripting
-
the purpose for powershell(powershell的目的)
- 就是讲powershell有多强
-
installing powershell – windows management framework(安装powershell)
- 略
- windows自带
-
launch powershell for the administrator(以管理员的身份运行powershell)
- 略
-
powershell security goals(powershell安全目标)
- secured by default
- prevent mistakes by unintentional admins and users
- no script execution
- Ps1 associated with notepad
- must type path to execute a script
-
execution policy(执行策略)【重要====】
- powershell默认不执行脚本
- get/set-executionPolicyrestricted可以执行单个的命令,但是不能执行脚本
- unrestricted
- 允许运行未签名的脚本。对于从网络上下载的脚本,在运行前会进行安全性提示:
- allSigned
- 只能运行具有数字签名的脚本
- remoteSigned
- 从 Windows Server 2012 R2 开始,PowerShell 中默认的执行策略改成了 RemoteSigned。这个执行策略的意思是:当执行从网络上下载的脚本时,需要脚本具有数字签名,否则不会运行这个脚本。如果是在本地创建的脚本则可以直接执行,不要求脚本具有数字签名。
- 解锁:
unblock -file *\\* -verbose
- Bypass
- Bypass 执行策略对脚本的执行不设任何的限制,任何脚本都可以执行,并且不会有安全性提示。
- undefined
- Undefined 表示没有设置脚本策略。当然此时会发生继承或应用默认的脚本策略。
-
running scripts(运行脚本)
- 在powershell控制台中运行powershell脚本若脚本在当前目录下:./脚本名.ps1
- 使用绝对路径:C:/脚本名.ps1
powershell ISE overview(powershell编写工具ISE概述)
- 这是windows自带的一个powershell脚本编写工具
2. powershell\’s scripting language
-
powershell一切皆对象
2.1 变量
- 具有的变量类型[int]、[long]、[String]、[char]、[byte]、[bool]、[decimal]、[single]、[double]、[datetime]、[array]、[hashtable]
- powershell 不需要显示地去声明,可以自动创建变量,只须记住变量的前缀为$,创建好了变量后,可以通过变量名输出变量使用 $ 来创建或使用变量
- 想要获取实例的话,可以在powershell中运行命令:get-help New-Variable -examples
创建一个变量:day
New-Variable days
创建一个变量:zipcode,且赋值为 98033
New-Variable -Name "zipcode" -Value 98033
创建一个只读型的变量
New-Variable -Name Max -Value 256 -Option ReadOnly
该变量在当前作用域和创建的任何新作用域中可用,并且不能更改或删除。
New-Variable -Name \’TestVariable\’ -Value \’Test Value\’ -Option AllScope,Constant~~~
- 实例:~~~powershellSet-Variable -Name "desc" -Value "A description"】~~~
- 实例~~~powershell
获取以字母m开头的所有变量
Get-Variable m*
获取以字母m开头的所有变量的值
Get-Variable m* -ValueOnly
获取以字母M开头,和以字母P开头的所有变量
Get-Variable -Include M*,P*~~~
2.1 变量的声明
-
实例:~~~powershell
声明一个变量
$MyVar=2$="hello"
输出一个变量
$MyVar$write-output $MyVar
强类型变量
[String]$MyName="xiaoming"[int]$Oops="xiaoming" #这句会执行出错[String]$ComputerName=Read-host "请输入你的名字" #通过Read-host你可以实现与用户的交互write-output $ComputerName #输出变量$ComputerName的值
$a=[int]"1" #运行成功(将字符串1强制转化为整数1)$a="test" #运行成功
[int]$b="1" #运行成功$b="test" #运行失败(因为之前已经定义$b为int型了)
[datetime]$d="12/25/2013" #运行成功(变量$d为时间类型。若没有[datetime],那么就意味着$d只是一个简单的字符串变量,下面的函数将无法运行)$d.Day #运行成功(调用了日期对象的Day函数,函数返回25)
限制变量赋值
[validateset("a","b","c")][string]$x="a" #此时我们只能为变量x赋值:"a"或"b"或"c"$a="b" #运行成功$a="test" #运行失败~~~
2.2 引号
-
实例:~~~powershell
powershell中的 单引号 和 双引号
双引号解析变量
$i="powershell"
将下面的代码粘贴在 powershell ISE 中你会瞬间醒悟(因为ISE中有颜色标识)
"This is the variable $i, and $i Rocks!" #使用双引号,里面的$i依然可以被正常解析\’This is the variable $i, and $i Rocks!\’ #使用单引号,里面的$i就变为了单纯的字符串 "$i""This is the variable `$i, and $i Rocks!" #使用反引号,可以对$i进行转义,使其变为了单纯的字符串"$i"
$computerName="client"get-service -name bits -computerName $computerName | select MachineName,Name,Status~~~
2.3 子表达式:
-
实例:~~~powershell
$(表达式)被称为:子表达式
在字符串中,$()的使用,可以避免在键入名称和使用工具时发生混乱。
$p = get-process lsass"process id = $p.id"
我们的本意是想访问$p对象中的id属性,但是由下面的输出我们可以看到,【在字符串中】,这样直接访问是不行的
输出:process id = System.Diagnostics.Process (lsass).id
"process id = $($p.id)"
这样才可以【在字符串中】访问$p对象的id属性
输出:process id = 864
"process id = $(read-host -prompt "what should i give them?")"
输出:what should i give them?: nicai –> process id = nicai
\’process id = $(read-host -prompt "what should i give them?")\’
输出:process id = $(read-host -prompt "what should i give them?")
2.4 对象-objectMembers
-
实例~~~powershell
get-member命令(简写:gm):用来查询Powershell对象有哪些属性与方法
在这里get-service命令本身返回的是一个对象数组,但是-name参数已经自动的筛选了对象属性name等于bits的对象,所以这里没有使用数组
$service=get-service -name bits$service | gm # 查看$service对象有哪些属性与方法$service.status # 访问$service对象的status属性$service.stop() # 访问$service对象的stop()方法,通过这行代码我们也可以看到,powershell可以操作windows服务$msg="service name is $($service.name.toupper())" # 使用了子表达式$msg
#working with multiple objects#在这里get-service命令本身返回的是一个对象数组$services=get-service$services[0] # 访问对象数组中的第一个对象$services[0].status # 访问对象数组中的第一个对象的status属性$services[-1].name # 访问对象数组中的最后一个对象的name属性"service name is $($services[4].displayname)""service name is $($services[4].name.toupper)"
范围运算符(..)
$services[1..5] # 按 顺序 显示前5条对象$services[5..1] # 按 逆序 显示前5条对象~~~
2.5 括号
-
实例~~~powershell
创建一个txt和csv文件
\’DC\’,\’client\’ | out-file c:\\computers.txt"computerName,IPAddress" | out-file c:\\computers.csv"DC,192.168.3.10" | out-file c:\\computers.csv -append"client,192.168.3.100" | out-file c:\\computers.csv -append
从一个txt文件中获取名字
get-service -name bits -computername (get-content c:\\computer.txt)
从一个csv文件中获取名字(以下两行代码执行效果相同)
因为命令:import-csv c:\\computers.csv执行完之后返回的是一个对象,但是-computername参数所需的是字符串,所需需要select进一步取得对象属性
get-service -name bits -computername (import-csv c:\\computers.csv | select -expandproperty computersname)get-service -name bits -computername (import-csv c:\\computers.csv).computername
使用 get-adcomputer
invoke-command -computername(get-adcomputer -filter "name -like \’C\’" | select -expandproperty name) -scriptblock {get-service -name bits}~~~
2.6 if
-
实例~~~powershellif($this -eq $that)elseif($those -ne $them)elseif($we -gt $they)else
$status=(get-service -name bits).statusif($status -eq "Running"){clear-hostwrite-output "service is being stopped"stop-service -name bits}else{clear-hostwrite-output "service is already stopped"}
if还有一种简便的写法
$test = if($false){"1"}else{"2"}$test~~~
2.7 switch
-
实例~~~powershell$status = 3switch($status){0 {$status_text=\’ok\’}1 {$status_text=\’error\’}2 {$status_text=\’jammed\’}3 {$status_text=\’overheated\’}4 {$status_text=\’empty\’}default {$status_text=\’unknown\’}}$status_text
或者这样写
$status_text = switch($status){0 {\’ok\’}1 {\’error\’}2 {\’jammed\’}3 {\’overheated\’}4 {\’empty\’}default {\’unknown\’}}$status_text~~~
2.8 循环
-
实例~~~powershell
do-while循环
$i=1do{write-output "powershell is great $i"$i++}while($i -le 5)
while循环
$i=5while($i -ge 1){write-output "scripting is great! $i"$i–}
foreach 循环
$services = get-serviceforeach($s in $services){$s.displayname}
for 循环
for($i=0;$i -lt 5;$i++){#do something}
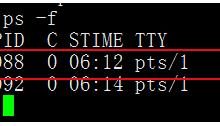
其他方式的循环
-process参数:用来指定应用于每个传入对象的脚本块
1..5 | foreach-object -process{ # 启动5次计算机start calc}
应用实例:
Powershell管道就像流水线,对于数据的处理是一个环节接着一个环节,如果你想在某一环节对流进来的数据逐个细致化的处理,可是使用ForEach-Object,
$_ 代表当前的数据。
如果使用Get-WmiObject 获取系统中的服务,并且想对每个服务进行定制化的处理可以使用ForEach-Object,
ForEach-Object的处理可以包含任意Powershell脚本,当然也包括条件语句
Get-WmiObject Win32_Service | ForEach-Object {if ($.ProcessId -gt 3000){"{0}({1})" -f _.DisplayName,.ProcessID # 这里的-f参数用于格式化输出字符串(上面的笔记有,直接ctrl+f 搜:-f)。}}~~~
3. simple scripts and functions(简单的脚本和函数)
- 本节概述
- 将命令转换为自动化脚本
- 选择要参数化的变量
- 向你的脚本中添加参数
- 函数
- 运行你的脚本/函数
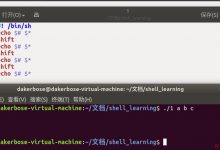
- 实例:~~~powershell
i like to start in the console
get-wmiobject -class win32_logicaldisk -filter "DeviceID=\’C:\’" -computername \’Localhost\’
the new CIM version if you like
get-ciminstance -classname win32_logicaldisk -filter "DeviceID=\’C:\’" -computername \’Localhost\’
装饰一波
get-wmiobject -class win32_logicaldisk -filter "deviceid=\’C:\’" -computername \’localhost\’ | select pscomputername,deviceID,@{n=\’Size(GB)\’;e={_.size / 1gb -as [int]}},@{n=\’Free(GB)\’;e={_.Freespace / 1gb -as [int]}}~~~
3.1 改进1
- 实例:~~~powershell
选择使用变量替换值
[string]$computerName=\’localhost\'[string]$drive=\’C:\’get-wmiobject -class win32_logicaldisk -filter "deviceID=\’$drive\’" -computername $computerName~~~
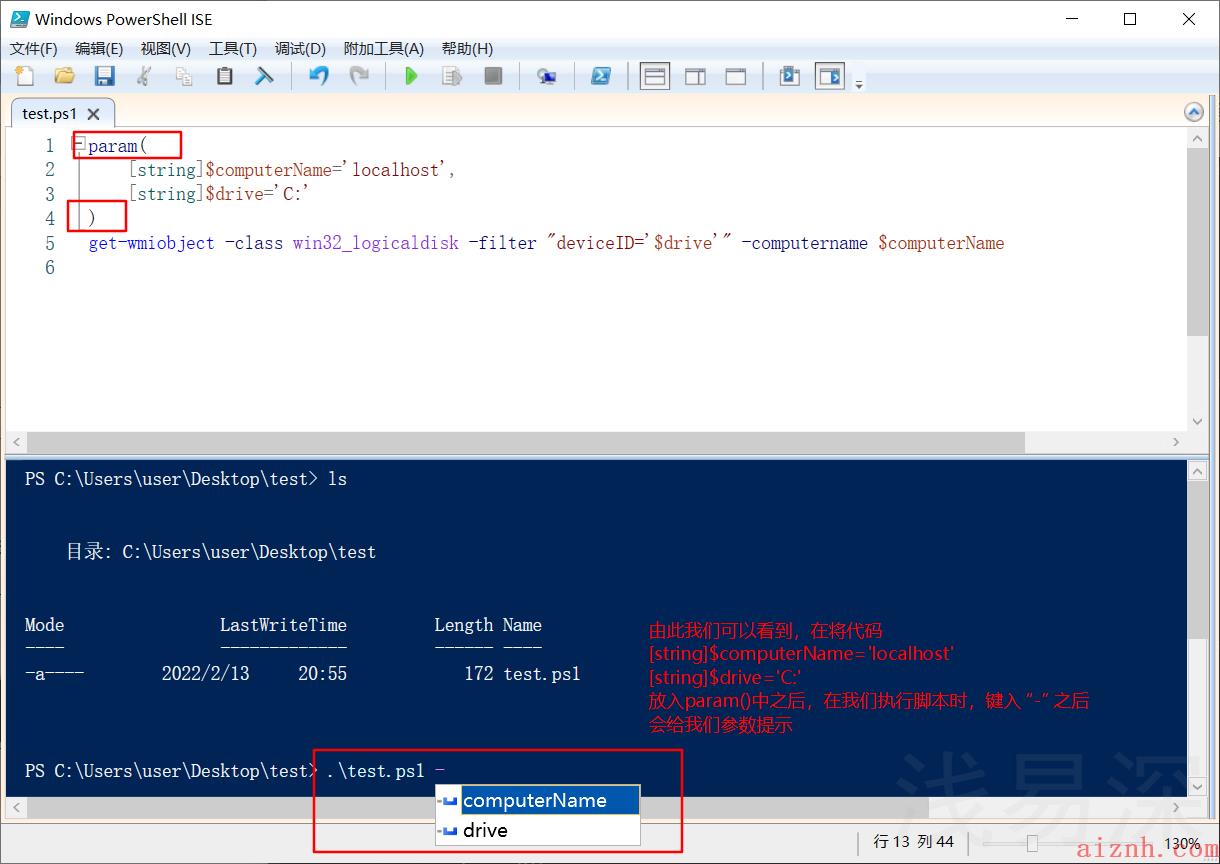
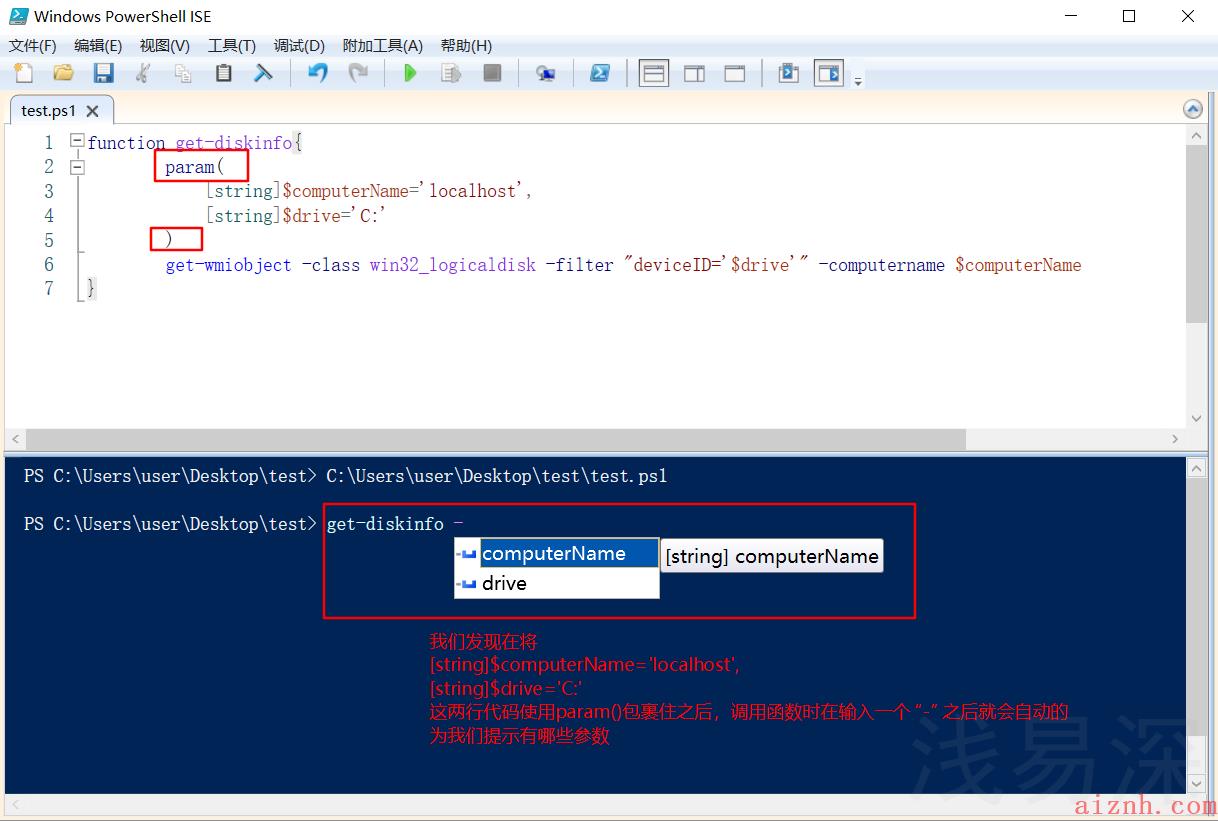
3.2 改进2:param()代码块
- 实例:~~~powershell
添加param代码块
param([string]$computerName=\’localhost\'[string]$drive=\’C:\’)get-wmiobject -class win32_logicaldisk -filter "deviceID=\’$drive\’" -computername $computerName~~~

3.3 改进3:在函数中使用 [CmdletBinding()] 与 param()
- 实例4:~~~powershellfunction get-diskinfo{[CmdletBinding()]param([string]$computerName=\’localhost\'[string]$drive=\’C:\’)get-wmiobject -class win32_logicaldisk -filter "deviceID=\’$drive\’" -computername $computerName}function get-cool{write-output "powershell is fun"}~~~


4. advanced functions(高级函数)
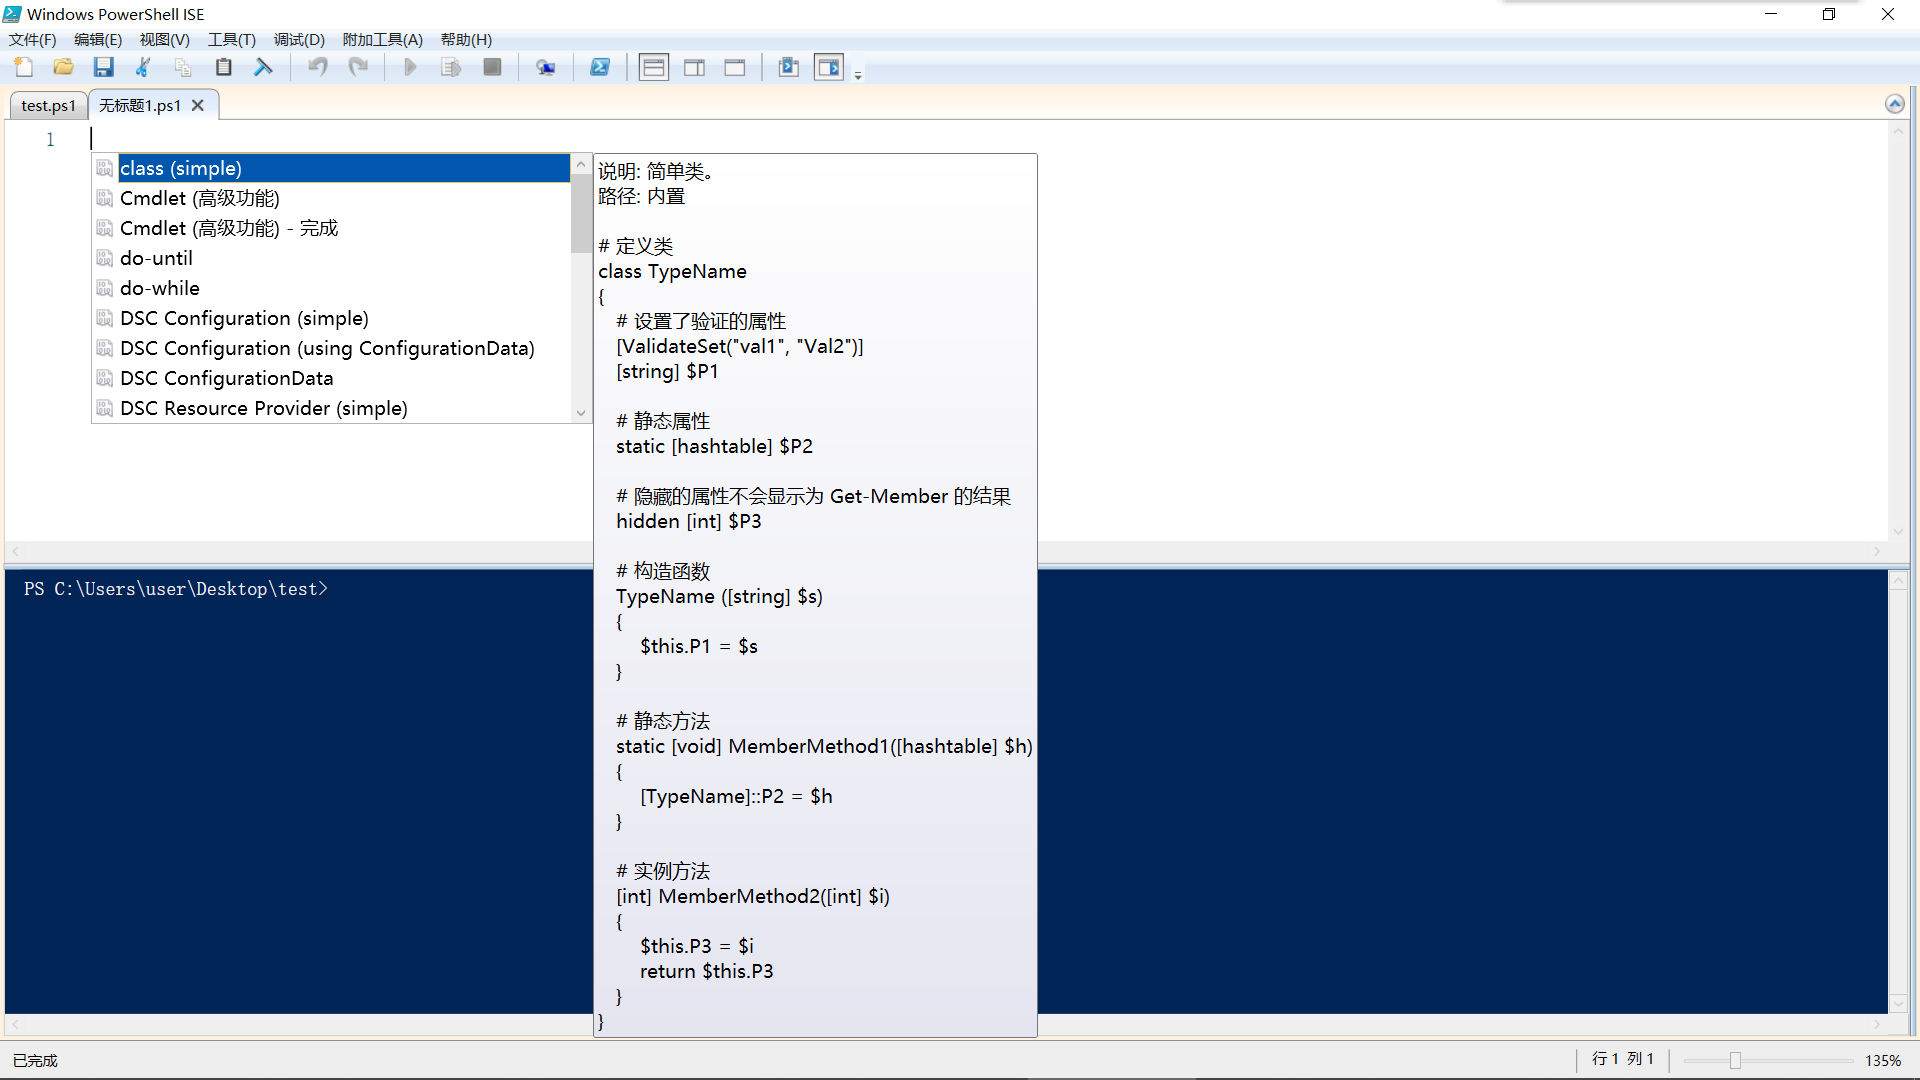
- 在powershell ISE中,我们可以使用 ctrl+j 来创建模板
- 本节概述高级函数的目的
- 一个高级函数的模板
- 创造和测试参数
- 添加你的代码
- 将对象写入管道
-
实例1:~~~powershellfunction verb-noun{[cmdletbinding()]param(#在此可见我们在[string]前面加上了[parameter()],该代码是用来具体规范参数的,比如:强制使用该参数,规定是否使用管道符来为该参数赋值等等[parameter()][string]$mystring[parameter()][int]$myint)begin{<#code#>} # 只执行一次process{<#code#>}# 可以执行多次(使用管道时,如实例2)end{<#code#>} # 只执行一次}~~~
-
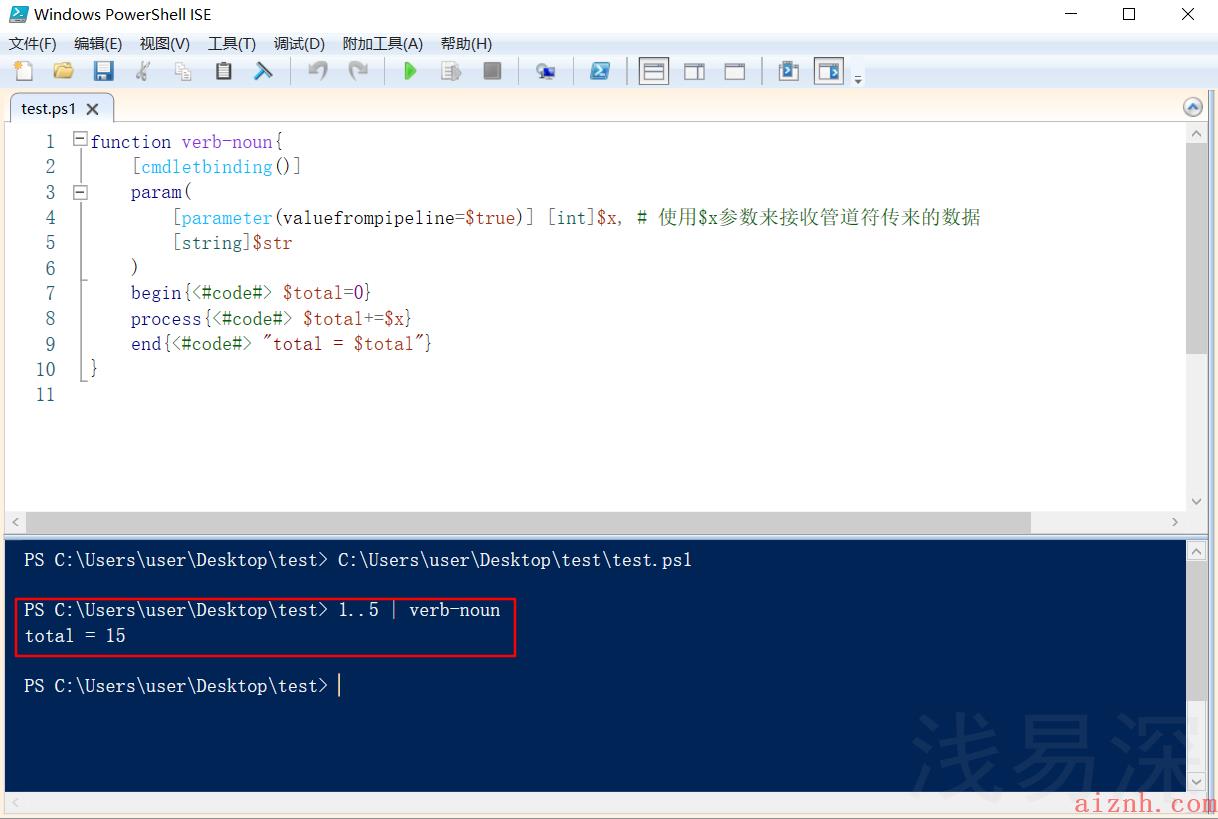
实例2:~~~powershellfunction verb-noun{[cmdletbinding()]param([parameter(valuefrompipeline=$true)] [int]$x, # 使用$x参数来接收管道符传来的数据[string]$str)begin{<#code#> $total=0}process{<#code#> $total+=$x}end{<#code#> "total = $total"}}1..5 | verb-noun~~~
-
实例3:~~~powershellinvoke-command -computername (get-content servers.txt)foreach($s in (get-content servers.txt))
#一定要搞明白以上两行代码之间的区别~~~
-
实例4:~~~powershellfunction verb-noun{[cmdletbinding()]param([string]$computername,# switch to turn on error logging[switch]$errorlog,[string]$logfile = \’c:\\errorlog.txt\’)beginprocessend}
function verb-noun{[cmdletbinding()]param([string[]]$computername, # 这里发生了改变,变成了字符串数组# switch to turn on error logging[switch]$errorlog,[string]$logfile = \’c:\\errorlog.txt\’)beginprocessend}
-
实例5:~~~powershellfunction verb-noun{[cmdletbinding()]param([string[]]$computername,# switch to turn on error logging[switch]$errorlog,[string]$logfile = \’c:\\errorlog.txt\’)begin{if($errorlog){write-verbose \’error logging turned on\’}else{write-verbose \’error logging turned off\’}foreach($computer in $computername){write-verbose "computer:$computer"}}process{foreach($computer in $computername){$os=get-wmiobject -computername $computer -class win32_operatingsystem$disk=get-wmiobject -computername $computer -class win32_logicaldisk -filter "deviceid=\’c:\’"
# 使用哈希表,存储我们所需要的数据,默认情况下,哈希表在存储数据时,数据之间是无序的# 如下,我们先添加了computername数据,但是在输出时,该数据可能就会是最后一个输出出来的$prop1=@{\'computername\'=$computer;\'os name\'=$os.caption;\'os build\'=$os.buildnumber;\'freespace\'=$disk.freespace / 1gb -as [int]}write-output $prop1# 若想要使哈希表有序,需要使用 [ordered] 关键字$prop2=[ordered]@{\'computername\'=$computer;\'os name\'=$os.caption;\'os build\'=$os.buildnumber;\'freespace\'=$disk.freespace / 1gb -as [int]}write-output $prop2# 由上面的输出我们可以看到非常的不人性,接下来我们自己创建一个新的对象,将哈希表赋给新对象,然后输出新对象$prop3=@{\'computername\'=$computer;\'os name\'=$os.caption;\'os build\'=$os.buildnumber;\'freespace\'=$disk.freespace / 1gb -as [int]}$obj=New-Object -TypeName psobject -Property $prop3write-output $obj}}end{}}~~~

5. more on parameters(详细介绍参数应用)
- 想要了解更多,可以运行命令:以管理员的身份运行:Update-Help
- get-help about_functions_advanced_parameters 或
- help about_functions_advanced_parameters -showwindow 【极力推荐这条命令】
- [parameter(mandatory=$true)]
5.1 [parameter(mandatory=$true)]:
- 强制用户使用该参数,否则系统会给予提示
function get-compinfo{[cmdletbinding()]param(# [parameter(mandatory=$true)] 强制用户使用该参数,否则系统会给予提示[parameter(mandatory=$true)] [string[]]$computername,[switch]$errorlog,[string]$logfile = \'c:\\errorlog.txt\')begin{if($errorlog){write-verbose \'error logging turned on\'}else{write-verbose \'error logging turned off\'}foreach($computer in $computername){write-verbose "computer:$computer"}}process{foreach($computer in $computername){$os=get-wmiobject -computername $computer -class win32_operatingsystem$disk=get-wmiobject -computername $computer -class win32_logicaldisk -filter "deviceid=\'c:\'"$prop3=@{\'computername\'=$computer;\'os name\'=$os.caption;\'os build\'=$os.buildnumber;\'freespace\'=$disk.freespace / 1gb -as [int]}$obj=New-Object -TypeName psobject -Property $prop3write-output $obj}}end{}}

5.2 [parameter(valueFromPipeLine=$true, valueFromPipelineByPropertyName=$true)]
- https://www.pstips.net/valuefrompipeline-and-valuefrompipelinebypropertynam
function Test-Function{param(# valueFromPipeLine=$true:接受一个完整的管道结果[Parameter(ValueFromPipeline=$true)][Int]$Number1,# valueFromPipelineByPropertyName=$true:期望接受一个包含“Number2”属性名的管道输入# 简单来说:就是将管道参数的输入经过自定义的处理之后,再将其传入$number2(即:传递给number2的参数是经过动态处理后的管道输入)[Parameter(ValueFromPipelineByPropertyName=$true)][Int]$Number2)Process{" Number1=$Number1 , Number2=$Number2"}}1..4 | Test-Function -number2 6# 如果将一个脚本块传给参数-Number2,PowerShell 首先不会报错,它会尝试去执行这个脚本块,尽量得到自己需要的类型的结果。5..10 | Test-Function -number2 {$_ * 2}

5.3 [parameter(helpMessage=\’…\’)]
- 用于添加该参数的帮助信息
function Test-Function{param([Parameter(mandatory=$true,helpMessage="please input some numbers")][Int[]]$Number)write-output $number}Test-Function

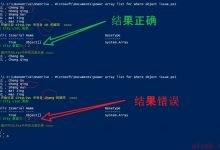
5.4 [alias(\’…\’)]
- 为变量起一个别名
function Test-Function{param([Parameter(mandatory=$true)][alias(\'nicai\',\'num123\')][Int[]]$Number,[Parameter()][string]$name)write-output $number}# 以下两种输入参数的方式效果相同,因为:nicai是number变量的别名Test-Function -nicai 1,2,3Test-Function -number 1,2,3
].png)
5.5 [validateSet(\’..\’,\’..\’,…)]
- 该选项被称为验证集:用于规范参数接收数据的值
function Test-Function{param([Parameter(mandatory=$true)][validateSet(\'chen\',\'xiao\')] # 该参数只能接收数据"chen" 或 "xiao"[string]$name)write-output $name}Test-Function -name "chen" -- 执行成功Test-Function -name "wang" -- 执行失败
].png)
5.6 [validateCount(参数1,参数2)]
- 用来控制参数接收数据的数量
function Test-Function{param([Parameter(mandatory=$true)][validateCount(0,2)] # num参数最少接收0个数据,最多只能接收2个数据[int[]]$num)write-output $num}Test-Function -num 1,2 -- 执行成功Test-Function -num 1,2,3 -- 执行失败
].png)
5.7 [validatePattern("正则表达式")]
- 用于规范参数接收的数据
function Test-Function{param([Parameter(mandatory=$true)][validatePattern("\\b\\d{1,3}\\.\\d{1,3}\\.\\d{1,3}\\.\\d{1,3}\\b")][string]$ipaddress)write-output $ipaddress}
].png)
6. write help(为脚本添加帮助信息)
- 本节概述
- 你为什么需要提供帮助
- 你把帮助放在哪里
- 使用基于评论的帮助
- 略(https://www.bilibili.com/video/BV1554y1Q76b?p=6)
7. error handling(错误处理)
-
本节概述
- error actions – $errorActionPreference
- setting the action or variable
- using try…catch…finally
- a better example
- logging your errors
-
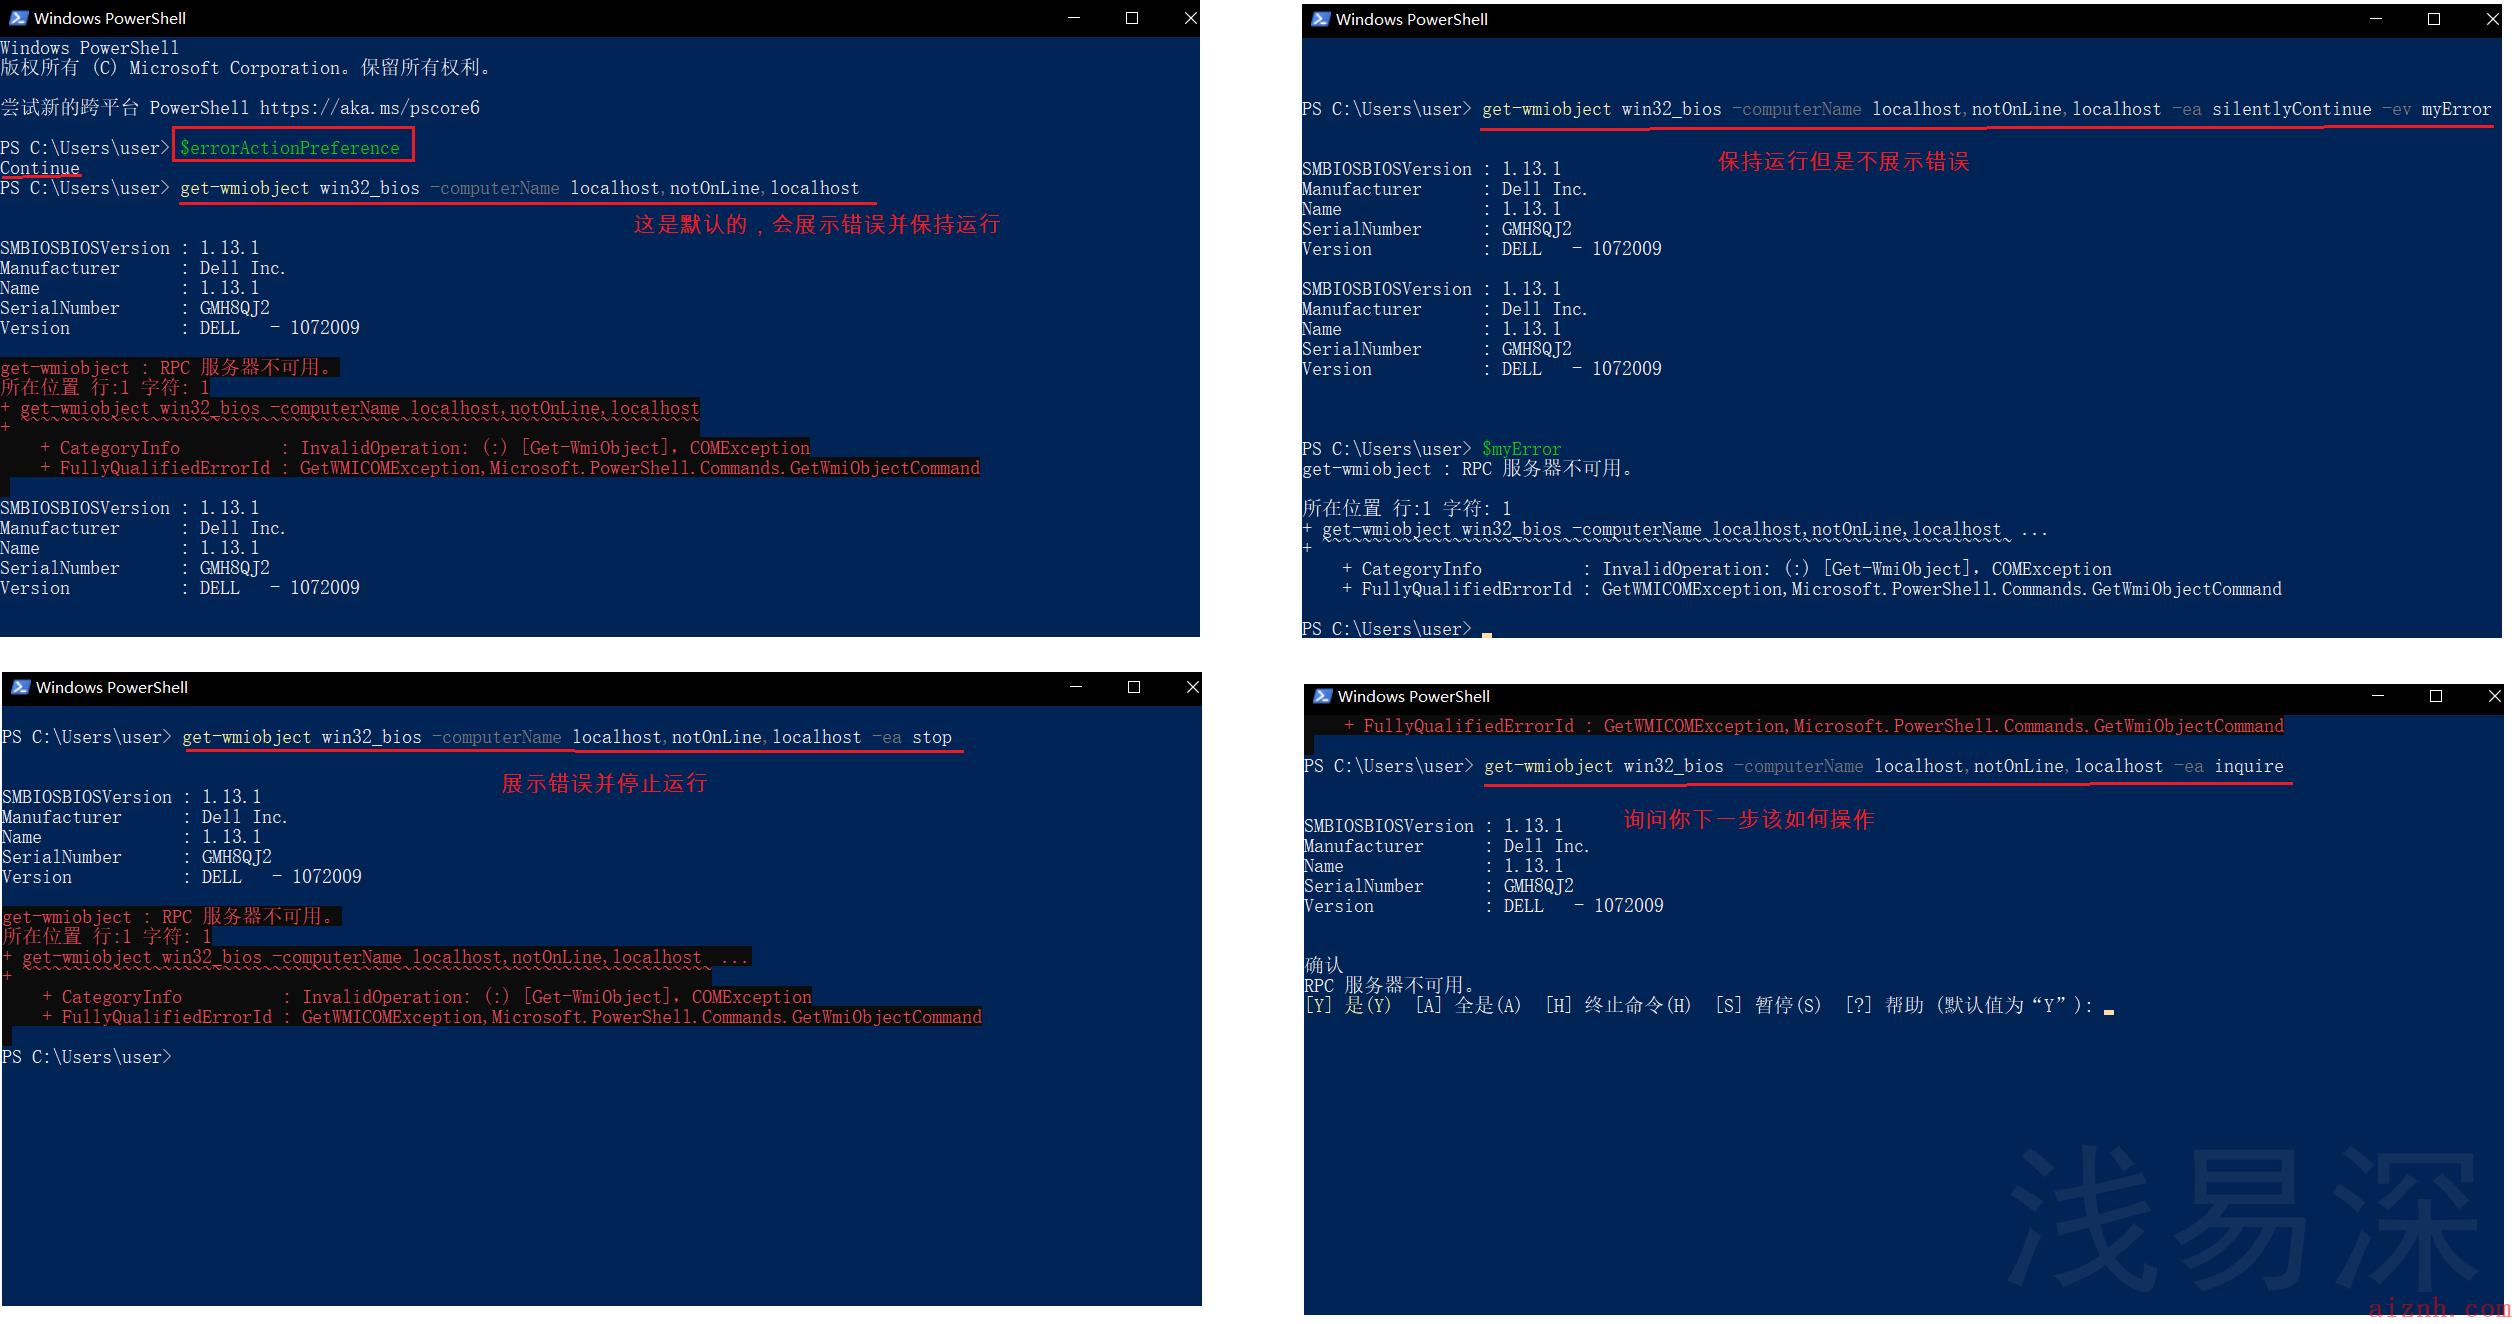
每当powershell命令遇到非终止错误时,它都会检查内置变量$errorActionPreference
- continue:这是默认的,会展示错误并保持运行
- silentlyContinue:保持运行但是不展示错误
- stop:展示错误并停止运行
- inquire:询问你下一步该如何操作
-
实例1:~~~powershell
-ea 即:-errorAction 该参数用于修改powershell遇到错误时的行为
-ev 即:-errorvariable 该参数用于保存错误信息
$errorActionPreference
get-wmiobject win32_bios -computerName localhost,notOnLine,localhost
get-wmiobject win32_bios -computerName localhost,notOnLine,localhost -ea silentlyContinue -ev myError$myError$myError | out-file "c:\\errorLog.txt"
get-wmiobject win32_bios -computerName localhost,notOnLine,localhost -ea stop
get-wmiobject win32_bios -computerName localhost,notOnLine,localhost -ea inquire~~~
-
实例2:~~~powershell$computer=\’notonline\’try{$os=get-wmiobject -computerName $computer -class win32_operatingSystem -errorAction stop -errorVariable error}catch{write-warning "you done made a boo-boo with computer $computer"}~~~

8. tools that make changes
- 对工具做出改变:也就是-whatif、-confirm参数和$psCmdlet.shouldProcess()函数的使用
- 这篇文章讲述的很详细:https://docs.microsoft.com/zh-cn/powershell/scripting/learn/deep-dives/everything-about-shouldprocess?view=powershell-7.1
- -confirm参数 和 -whatif参数-whatif参数:它允许你查看命令将执行什么操作,而不是进行更改。 这是测试命令影响的好方法,特别是在执行某些破坏性操作前。
- -confirm参数:提供了在执行操作前进行确认的机会。
- [cmdletbinding(supportsShouldProcess=$true, confirmImpact=\’High\’)]SupportsShouldProcess 可选参数值为$True, $False。当设置为$True时,高级函数将支持通用参数-whatif以及-confirm。
function set-stuff{# SupportsShouldProcess 可选参数值为$True, $False。当设置为$True时,高级函数将支持通用参数-whatif以及-confirm。# ConfirmImpact 可选参数值为High, Low, Medium, None。[cmdletbinding(supportsShouldProcess=$true, confirmImpact=\'Medium\')]param([parameter(mandatory=$true)][string]$computerName)process{if($psCmdlet.shouldProcess("$computerName")){write-output \'im changing something right now\'}}}
9. script and manifest modules(脚本和清单模块)
- 我如何创建一个模块呢?
- 实例1(现有以下代码)
function get-num1{$num1=1write-output "this is %num1"}function get-num2{$num2=2write-output "this is %num2"}function get-num3{$num3=2write-output "this is %num3"}
-
我们只需将上面的代码保存为:test.psm1(注意:不是以.ps1作为后缀,而是.psm1)
-
至此,该模块创建完成(怎么样,是不是意想不到?!)
-
要使用该模块的话,我们只需要导入该模块:import-module test.psm1 即可
-
get-command -module 模块名 (该命令可以让我们知道该模块中有什么方法)
-
实例2:
# 使用绝对路径导入模块import-module c:\\scripts\\test.psm1# 获取目录列表get-command -module test# 移除模块并导入新的模块remove-module test; import-module c:\\scripts\\test2.psm1# 将你的模块放在恰当的位置(C:\\Users\\user\\Documents\\WindowsPowerShell\\Modules)# 将模块放在该位置的话,就不再需要我们进行手动的导入模块了,可以直接的使用$path=$env:PSModulePath -split ";"$path[0] # 输出:C:\\Users\\user\\Documents\\WindowsPowerShell\\Modules$modulePath=$path[0] + "\\test"$modulePath# 注意:你所要创建的用于存储模块的文件夹的名称要与你的模块名保持一致new-item $modulePath -itemtype directorycopy-item c:\\scripts\\test.psm1 -destination $modulePath -force
- 创建一个模块【清单】模块清单是一个包含键和值的哈希表的文本文件,它用于描述模块的内容并确定如何处理模块
- 当我们的模块被导入的时候,powershell会去寻找:一个模块清单(比如:test.psd1),但是要注意:文件名要与模块文件夹的名字相同
- 一个二进制的模块(比如:test.dll)
- 一个脚本模块(比如:test.psm1)
# 在这里我们创造一个 test.psm1 模块的清单 test.psd1new-moduleManifest -path \'C:\\Users\\user\\Documents\\WindowsPowerShell\\Modules\\test\\test.psd1\' -author xiaom -companyname mycom -copyright \'(c)2013 jumpstart\' -moduleVersion 1.0 -description \'the jumpstart module\' -powershellVersion 3.0 -rootModule .\\test.psm1# 我们也可以使用该命令进行图形化的编辑清单show-command new-moduleManifest# 查看清单ise C:\\Users\\user\\Documents\\WindowsPowerShell\\Modules\\test\\test.psd1
- 我们也可以自定义一个【视图】(具体的使用的话,这里就不进行详细的阐述了)作用:比如在我们运行命令 get-service 之后,其结果就会在控制台进行回显,而如果我们自定义了该命令的视图,那么我们就可以控制该命令的回显样式。
- 视图文件的命名:名称.format.ps1xml
- 因此,当我们在创建一个模块之后,可以为它自定义一个视图,从而获得我们想要的回显样式
- 我们可以在创建 模块清单 的时候,来说明该模块所采用的视图~~~powershellnew-moduleManifest -path \’C:\\Users\\user\\Documents\\WindowsPowerShell\\Modules\\test\\test.psd1\’ -author xiaom -companyname mycom -copyright \'(c)2013 jumpstart\’ -moduleVersion 1.0 -description \’the jumpstart module\’ -powershellVersion 3.0 -rootModule .\\test.psm1 -formatToProcess .\\Jason.format.ps1xml~~~
- 使用方法可以看这个视频的后半段:https://www.bilibili.com/video/BV1554y1Q76b?p=9