爱站程序员基地
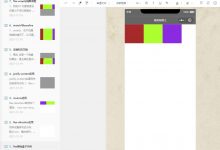
本文实例为大家分享了JS+css3实现幻灯片轮播图的具体代码,供大家参考,具体内容如下
<!DOCTYPE html><html><head><meta charset=\"UTF-8\"><title></title><style>*{margin: 0;padding: 0;-webkit-touch-callout: none;-webkit-user-select: none;-khtml-user-select: none;-moz-user-select: none;-ms-user-select: none;user-select: none;}.clearfix:after{clear: both;}.clearfix:after,.clearfix:before{content: \"\";display: table;}.slide_view{width: 600px;height: 200px;overflow: hidden;margin: 40px auto;position: relative;}ul{width: 600px;height: 100%;}li{position: absolute;width: 600px;height:100%;opacity: 0;}li.active{opacity: 1;}.hor-slide-ani .next-out{animation: hor-slide-next-out .8s forwards cubic-bezier(0.7, 0, 0.3, 1);}.hor-slide-ani .next-in{animation: hor-slide-next-in .8s forwards cubic-bezier(0.7, 0, 0.3, 1);}.hor-slide-ani .prev-out{animation: hor-slide-prev-out .8s forwards cubic-bezier(0.7, 0, 0.3, 1);}.hor-slide-ani .prev-in{animation: hor-slide-prev-in .8s forwards cubic-bezier(0.7, 0, 0.3, 1);}@keyframes hor-slide-next-out{from{opacity: 1;}to{opacity: 1;transform: translateX(100%);}}@keyframes hor-slide-next-in{from{opacity: 1;transform: translateX(-100%);}to{opacity: 1;transform: translateX(0);}}@keyframes hor-slide-prev-out{from{opacity: 1;}to{opacity: 1;transform: translateX(-100%);}}@keyframes hor-slide-prev-in{from{opacity: 1;transform: translateX(100%);}to{opacity: 1;transform: translateX(0);}}.prev{position: absolute;left: 10px;top: 40%;display: block;padding: 10px;text-align: center;width: 20px;height: 20px;border-radius: 100%;background: rgba(0,0,0,.4);color: white;font-size: 22px;line-height: 22px;}.next{position: absolute;right: 10px;top: 40%;display: block;padding: 10px;text-align: center;width: 20px;height: 20px;border-radius: 100%;background: rgba(0,0,0,.4);color: white;font-size: 22px;line-height: 22px;}</style></head><body><div class=\"slide_view\"><ul class=\"slides clearfix hor-slide-ani\" style=\"position: relative;\"><li class=\"active\" style=\"background: salmon;\">1</li><li style=\"background: darkcyan;\">2</li><li style=\"background: seagreen;\">3</li><li style=\"background: sandybrown;\">4</li></ul><div class=\"control\"><span class=\"prev\">←</span><span class=\"next\">→</span></div></div></body>
<script type=\"text/javascript\" src=\"js/jquery-2.1.4.min.js\" ></script><script>var aniName = (function(el) {var animations = {animation: \'animationend\',OAnimation: \'oAnimationEnd\',MozAnimation: \'mozAnimationEnd\',WebkitAnimation: \'webkitAnimationEnd\',};for (var t in animations) {if (el.style[t] !== undefined) {return animations[t];}}return false;})(document.createElement(\'div\'));var aniEndCallback=function($ele,endCall){if(aniName && typeof endCall == \'function\'){var called=false;//在每次transitionEnd的事件后执行该函数var callback = function(){if (!called){called=true;endCall($ele);}};$ele[0].addEventListener(aniName,function(){callback();//通过setTimeout来补救windowphone中不触发事件的问题setTimeout(callback,200);},false);}else{endCall($ele);}};$(function(){var aniStatus = false;$(\'.next\').click(function(){if(aniStatus){return};aniStatus = true;var $slides = $(\'.slides\').children(), slideCount = $slides.length, $active = $(\'.active\'), curActiveIndex = $(\'.active\').index(), nextActiveIndex = curActiveIndex -1;if(curActiveIndex == 0){nextActiveIndex = slideCount-1;}$slides.eq(curActiveIndex).addClass(\'next-out\');$slides.eq(nextActiveIndex).addClass(\'next-in\');aniEndCallback($active,function($ele){aniStatus = false;$active.removeClass(\'next-out active\');$slides.eq(nextActiveIndex).removeClass(\'next-in\').addClass(\'active\');});});$(\'.prev\').click(function(){if(aniStatus){return;}//不在动画状态,才能执行aniStatus= true;var $slides = $(\'.slides\').children(), slideCount = $slides.length, $active = $(\'.active\'), curActiveIndex = $(\'.active\').index(), nextActiveIndex = curActiveIndex + 1;if(curActiveIndex == slideCount-1){nextActiveIndex = 0;}$slides.eq(curActiveIndex).addClass(\'prev-out\');$slides.eq(nextActiveIndex).addClass(\'prev-in\');aniEndCallback($active,function($ele){aniStatus = false;$active.removeClass(\'prev-out active\');$slides.eq(nextActiveIndex).removeClass(\'prev-in\').addClass(\'active\');});});setInterval(function(){$(\'.prev\').trigger(\'click\')},4000);});
以上就是本文的全部内容,希望对大家的学习有所帮助
您可能感兴趣的文章:
- js实现幻灯片轮播图
- js实现轮播图的完整代码
- 原生js实现轮播图的示例代码
- js实现支持手机滑动切换的轮播图片效果实例
- js实现点击左右按钮轮播图片效果实例
- JS轮播图实现简单代码
- JS实现左右无缝轮播图代码
- JS实现自动轮播图效果(自适应屏幕宽度+手机触屏滑动)
- 原生js实现无限循环轮播图效果
- 使用html+js+css 实现页面轮播图效果(实例讲解)