爱站程序员基地
目录
- 1.特殊变量
- 2.内部环境变量
- 3.整数以及字符判断
- 3.1整数判断
- 3.2字符测试
- 1.写一个脚本,输入三个数字进行相应的加减乘除
- 2.猜数字游戏
- 3.写一个脚本,让nginx服务设置开机自启
- 4.利用for循环,创建user序号1-100的用户
- 5.利用while循环,计算1+2…100的值
- 6.apache简单的一个编译部署脚本
1.特殊变量
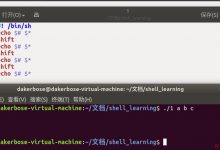
$#:查看变量参数的个数
$0:查看脚本的名字
$!:查看shell后台的pid
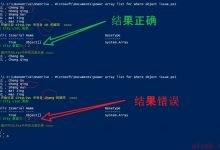
$@:查看传递脚本所有参数的列表
$*:查看所有参数的列表,单字符串形式显示
$$:脚本本身进程的ID
$?:上一条命令的结果,显示0则成功,不是0则失败
2.内部环境变量
$PATHSHELL 当前使用的shellUID 当前的用户环境 {0|其它数字}={root|其它用户}HOME 当前使用的用户目录PWD 当前的目录HISTFILE 历史命令路径PS1 #[\\u@\\h \\W]\\$ 用户@主机名\\目录\\$
3.整数以及字符判断
3.1整数判断
-eq 测试俩个整数是否相等 (equal)-ne 测试俩个整数是否不等 (unequal)-gt 测试一个数是否大于一个数 (greater than)-lt 测试一个数是否小于一个数 (less than)-ge 测试一个数大于或等于-le 测试一个数小于或等于
3.2字符测试
=~ 测试是否被正则表达式匹配-z \"string\" 检测字符是否为空,空则真,不空则假 如: [ -z \"\" ]为真空则为真-n \"string\" 检测字符是否不空,不空则真,不空则假字符相比较大小用[[ ]],比的是第一个字母(a-zA-Z)都是大写或者都是小写比较ascii值 越大则越大有大写又有小写则A>a B>b 但是A不大于b的情况[root@slave02 ~]# [[ \"A\" < \"B\" ]][root@slave02 ~]# echo $?0[root@slave02 ~]# [[ \"a\" < \"b\" ]][root@slave02 ~]# echo $?0
4.文件判断
-e:文件是否存在-b:测试是否块设备文件-c:测试是否字符设备文件-f:测试是否普通文件-d:测试是否目录-h:测试是否符号链接文件-L:测试是否是符号链接文件-p:测试是否是命名管道文件-S:测试是否是套接字文件权限相关:-r 读-w 写-x 执行特殊权限-g-u-k等
5.read输入
选项:-p:指定提示符-t:指定提示等待的时间(秒)
6.if判断
多分支:if [ 条件 ];thenstatement1 .....elif [ 条件2 ];then statement2 ....else statement3 ....fi
7.案例选择判断
case $变量名 in\'value1\')statement...;;\'value2\')statement...;;*)statement..;;esac#case支持的通配符:* //任意长度任意字符? //任意单个字符[] //指字范围内的任意单个字符start|START //俩种选择
8.for循环
第一种:for ((expr1;expr2;expr3)) # expr1:初始值条件#expr2:循环的范围进行退出#expr3:变量的值使用{ 循环体}for ((expr1;expr2;expr3));do 循环体done第二种:for 变量 in 列表; do 循环体done
9.while循环
while循环用于不知道循环次数的场景,注意有退出条件while [ 条件 ];dostatement.....done
10.深入练习
1.写一个脚本,输入三个数字进行相应的加减乘除
[root@slave02 ~]# cat script01.sh#!/bin/basha=$1b=$2c=$3num1=$[$a+$b+$c]num2=$[$a-$b-$c]num3=$[$a*$b*$c]echo \"$a + $b + $c\" = $num1echo \"$a - $b - $c\" = $num2echo \"$a * $b * $c\" = $num3awk \"BEGIN{printf \\\"$a/$b/$c=%.2f\\n\\\",$a/$b/$c}\"[root@slave02 ~]# source script01.sh 100 10 9100 + 10 + 9 = 119100 - 10 - 9 = 81100 * 10 * 9 = 9000100/10/9=1.11
2.猜数字游戏
规则:指定一个数字,只要猜到了这个数字则过关,否则显示数字大了或者数字小了
[root@master ~]# cat test03.sh#!/bin/bashnums=99read -p \"please enter a number: \" numif [ $num -gt $nums ];thenecho \"数字大了\"elif [ $num -lt $nums ];thenecho \"数字小了\"elseecho \"猜对\"fi[root@master ~]# . test03.shplease enter a number: 10数字小了[root@master ~]# . test03.shplease enter a number: 100数字大了[root@master ~]# . test03.shplease enter a number: 99猜对
3.写一个脚本,让nginx服务设置开机自启
#$0是nginx本身 $1是变量对应着下面的start|stop|restart|status[root@192 init.d]# pwd/etc/init.d[root@192 init.d]# cat nginx#!/bin/bashcase $1 in\'start\')/usr/local/nginx/sbin/nginx;;\'stop\')/usr/local/nginx/sbin/nginx -s stop;;\'restart\')/usr/local/nginx/sbin/nginx -s stop/usr/local/nginx/sbin/nginx;;\'status\')num=$(ps -ef |grep -v \'grep\'|grep -c nginx:)if [ $num -eq 0 ];thenecho \"nginx is stoped\"elseecho \"nginx is running\"fi;;*)echo \"Usage: service $0 start|stop|restart|status\";;esac#当判断有nginx进程数量则认为开启服务,否则认为服务开启失败
4.利用for循环,创建user序号1-100的用户
#创建用户user1-100[root@master ~]# cat test05.sh#!/bin/bashfor (( i=1;i<=100;i++));douseradd user$iid user$i &>/dev/nullif [ $? -eq 0 ];then #只要判断用户成功,$?才会显示0,显示0则代表执行下一条命令,否则显示user以及存在echo \"success\"elseecho \"user is exis\"fidone
5.利用while循环,计算1+2…100的值
[root@slave02 ~]# cat which.sh#!/bin/bashs=0 #初始值0i=1 #判断的数值,最终到100停止while [ $i -le 100 ];dos=$[$s+$i]i=$[$i+1] #自增加数doneecho $s[root@slave02 ~]# source which.sh5050#随便输入一个数字进行计算的话,把100改为$1即可
6.apache简单的一个编译部署脚本
1.一般项目或者脚本,文件,放在相应的位置里,方便查找[root@slave02 tmp]# pwd/tmp[root@slave02 tmp]# lsapache[root@slave02 apache]# lsinstall_apache.sh soft[root@slave02 soft]# lsapr-1.7.0.tar.bz2 apr-util-1.6.1.tar.bz2 httpd-2.4.48.tar.bz2 httpd.service[root@slave02 apache]# cat install_apache.sh #!/bin/bash echo \"欢迎使用此脚本\" apachedir=/usr/local/apache if [ $UID -ne 0 ];thenecho \"伙计,请使用管理员身份运行\"fiecho \"正在安装依赖包...\"yum -y install epel-release bzip2 \"@Development Tools\" &>/dev/nullyum -y install openssl-devel pcre-devel expat-devel libtool gcc gcc-c++ make &>/dev/nullid apache &>/dev/nullif [ $? -ne 0 ];thenuseradd -r -M -s /sbin/nologin apacheficd /tmp/apache/soft/tar -xf apr-1.7.0.tar.bz2tar -xf apr-util-1.6.1.tar.bz2tar -xf httpd-2.4.48.tar.bz2sed -i \'/ $RM \"$cfgfile\"/d\' apr-1.7.0/configureecho \"正在编译安装apr,请听听歌放松放松.......\"cd apr-1.7.0/[ ! -d /usr/local/apr ]if [ $? -eq 0 ];then./configure --prefix=/usr/local/apr && make && make install &>/dev/nullelseecho \"apr已经安装\"ficd ../apr-util-1.6.1/[ ! -d /usr/local/apr-util ]if [ $? -eq 0 ];then./configure --prefix=/usr/local/apr-util --with-apr=/usr/local/apr && make && make install &/dev/nullelseecho \"apr-util已经安装\"ficd ../httpd-2.4.48/[ ! -d /usr/local/apache/ ]if [ $? -eq 0 ];then./configure --prefix=$apachedir \\--sysconfdir=/etc/httpd24 \\--enable-so \\--enable-ssl \\--enable-cgi \\--enable-rewrite \\--with-zlib \\--with-pcre \\--with-apr=/usr/local/apr \\--with-apr-util=/usr/local/apr-util/ \\--enable-modules=most \\--enable-mpms-shared=all \\--with-mpm=preforkmake && make install &>/dev/nullelseecho \"httpd已经安装\"ficd#有影响的加判断,没影响的忽略echo \"export PATH=$apachedir/bin:\\$PATH\" > /etc/profile.d/httpd.shln -s $apachedir/include/ /usr/include/apache &>/dev/nullgrep \'apache/man\' /etc/man_db.conf &>/dev/nullif [ $? -eq 1 ];thensed -i \"20aMANDATORY_MANPATH $apachedir/man\" /etc/man_db.confelseecho \"apache is help exists\"fi[ ! -f /usr/lib/systemd/system/httpd.service ]if [ $? -eq 0 ];thencp /clq/apache/soft/httpd.service /usr/lib/systemd/system/elseecho \"已经存在文件跳过\"fisystemctl daemon-reloadsystemctl enable --now httpdnum02=$(ps -ef |grep -v \'grep\'|grep -c httpd)if [ $num02 -eq 0 ];thenecho \"httpd自启失败\"elseecho \"httpd自启成功\"fiecho \"欢迎下次使用\"[root@slave02 apache]# chmod +x install_apache.sh[root@slave02 apache]# source install_apache.sh[root@slave02 apache]# source install_apache.sh欢迎使用此脚本正在安装依赖包...正在编译安装apr,请听听歌放松放松.......apr以及安装apr-util以及安装httpd已经安装apache is help exists已经存在文件跳过httpd自启成功欢迎下次使用[root@slave02 ~]# systemctl status httpd.service● httpd.service - Start httpLoaded: loaded (/usr/lib/systemd/system/httpd.service; enabled; vendor preset: disabled)Active: active (running) since Sat 2021-09-04 17:45:33 CST; 5h 57min agoMain PID: 834761 (httpd)Tasks: 7 (limit: 5782)Memory: 6.3MCGroup: /system.slice/httpd.service├─834761 /usr/local/apache/bin/httpd -k start├─835358 /usr/local/apache/bin/httpd -k start├─835359 /usr/local/apache/bin/httpd -k start├─835360 /usr/local/apache/bin/httpd -k start├─835361 /usr/local/apache/bin/httpd -k start├─835362 /usr/local/apache/bin/httpd -k start└─836063 /usr/local/apache/bin/httpd -k start[root@slave02 ~]# ss -antlState Recv-Q Send-Q Local Address:Port Peer Address:Port ProcessLISTEN 0 128 0.0.0.0:22 0.0.0.0:*LISTEN 0 128 *:80 *:*LISTEN 0 128 [::]:22 [::]:*
以上就是入门shell脚本基础解析的详细内容,更多关于shell脚本的资料请关注脚本之家其它相关文章!
您可能感兴趣的文章:
- shell脚本语言的使用(超全超详细)
- Linux Shell脚本系列教程(二):终端打印命令详解
- Linux shell传递参数实现原理及代码实例
- shell脚本4种执行方式
- linux反弹shell的原理详解
- 自己常用的一些shell脚本分享